Scripts
Machine Catalog with overflow
The idea for the concept behind this blog post was born during a lunch break in summer 2018 when in Switzerland the temperature was pretty high and my colleague Stefan Moser and I had the idea to go swimming in the Aare river instead have a proper lunch. This is a good example of how leaving the Office can facilitate creativity! During our walk upstream, Stefan explained to me that he thinks we need to give vGPU also to normal Office Worker users as long we have enough capacity.
Beginning of 2018 we equipped our virtual desktop infrastructure with Nvidia Tesla M10 GPUs after we’ve done some tests and figured out that only in this way we can get the same high user experience like with a powerful physical laptop computer. We purchased 4 new VMware Hosts with each 2 Tesla M10 GPUs, this is good enough to equip 256 VDIs with an M10-B Profile, which is recommended with Windows 10 and 2 screens.
This means our challenge was having 250 pooled non-persistent VDIs with only 100 vGPUs, that’s the amount of vGPUs we don’t need for the dedicated VDIs with special GPU needs. The idea was also to use vGPU-VDIs as long we have and then switch to the cheap GPU-less desktop.

The implementation of this solution is pretty simple if you know the Power of Tags in a Citrix Virtual Desktop environment.
Recipe:


Further, build a simple PoSh script with 3 functions:
– check the number of free VDI’s in the GPU-Catalog
– set tag “availibleForUsers”
– remove “availibleForUsers” tag as soon
enough free VDIs are in GPU pool
The script is running as a scheduled Task e.g. every 5 minutes and opens and close the overflow pool.
Of course, depending on the Logon storm you need to consider how often the script is running and how many spare desktops you keep before you close the pool (VDI Offset, $FreeMachineThreshold in the Script).
Other use cases:
This script is not only useable to overflow a GPU/Non-GPU workload, but it can also be used in the various scenarios.
Just some examples:
– different hardware types, first the new cool servers than the old hardware.
– existing On-Prem resources before pay-per-use cloud resources
– Catalog in the same location before in a remote location (without any Citrix zones)
The script is available on GitHub:
https://github.com/sacha81/MachineCatalogOverflow
FAQ:
Q: Are Tags also working when you are using Citrix Cloud?
A: Yes They are. (Thanks @bjoernmue for this info)
PowerManagement for dedicated Citrix desktops? Yes with Tags!
Are you using Tags in your XenApp & XenDesktop environment? Maybe you should. Tags to resources, in my case desktops can be very powerful especially in combination with PoSh scripts. You can do actions for machines depending on the tag. Of course you also can use tags to filter Citrix policies on it, also useful.
I had the Problem that I have a delivery group with dedicated Win10 desktops so for dedicated desktops there is no power management. Usually it’s also not needed because if a user launch a Citrix Session over Storefront the machine get’s powered on. The problem in my case, sometimes users connects on an other ways than Citrix to his desktop, so this built-it construct doesn’t work. So if they shutdown their virtual Desktop they can newer ever access it until an admin power it on over director or studio.
My solution to this was, I tagged this special user machines with a tag “AlwaysOnline” in Studio and I wrote this small script which runs every 15 minutes:
param([string]$tags=$(throw "Tag parameter is required"), [string]$poweroperation=$(throw "Power operaton parameter is required"))
#==============================================================================================
# Created on: 09.2016 Version: 0.2
# Created by: Sacha Thomet
# File name: PowerOperation-DependingMachineTags.ps1
#
# Description:  This is a Powershell to change the PowerState of VDI's or XenApp Servers in
#               a PowerManaged XenDesktop 7.x environment accodring to Tags.
#
# Prerequisite: None, a XenDesktop Controller with according privileges necessary
#
# Call by : Manual  or Scheduled Task
#==============================================================================================
# Load only the snap-ins, which are used
if ((Get-PSSnapin "Citrix.Broker.Admin.*" -EA silentlycontinue) -eq $null) {
try { Add-PSSnapin Citrix.Broker.Admin.* -ErrorAction Stop }
catch { write-error "Error Get-PSSnapin Citrix.Broker.Admin.* Powershell snapin"; Return }
}
# Change the below variables to suit your environment
#==============================================================================================


$maxmachines = "1000" # as default only 250 records, this increase it to 1000
#$tags = "AlwaysOnline" # if you comment out the param line you can have the tag here
#$poweroperation = "TurnOn"  # if you comment out the param line you can have the poweroperation here


$machines = Get-BrokerMachine -MaxRecordCount $maxmachines | Where-Object {$_.tags -eq $tags }


foreach($machine in $machines)
{
$machinename = $machine | %{ $_.MachineName }
Write-Host "Action $poweroperation will be performed for $machinename  "
New-BrokerHostingPowerAction  -Action $poweroperation -MachineName $machinename
}
I know I know, this is not a common use case, but the script construct show what is possible with tags … there are almost unlimited possibility to cover special cases with tags.
My example Script on GitHub: PowerOperation-DependingMachineTags.ps1
Finally 1.0 – but never finalized!
In November 2014 I created the blog post about the adaption of the PVS Script for XenApp/XenDesktop 7.x :
XenDesktop & XenApp FMA (7.x) HealthCheck – Oops!… I Did It Again
 Now after almost two years of continuous development on this Script, the XenApp & XenDesktop 7.x Health Check has now Version 1.0.
I started this script in a very basic version and in the meanwhile, a lot of tester and contributors helped to bring this script in this version. Just this year I started with GitHub and it’s surprising, the community who helped is awesome!
Now after a number of 0.x versions, just at the point we introduce the XML configuration file, I can say the version now has deserved the number 1.00.

The big benefit of the configuration in the XML file is in case you have multiple environments with the script you don’t need to edit the header section of the script which has earlier contained the config. On a new version of the script, you just replace the script in your environments and keep the XML file.
The XML file and the script need to be in the same directory and the Name of the XML file needs to be same like the script, e.g:
XA-and-XD-HealthCheck.ps1
XA-and-XD-HealthCheck_Parameters.xml
The XML-Config is introduced to this script by Stefan Beckmann (Twitter: @alphasteff)

The newest version of the script you can find on GitHub:
https://github.com/sacha81/XA-and-XD-HealthCheck

The HTML Output file gained some more input, even it was difficult to decide which feature request to consider and which not.
We check now CPU, Memory and disk space of controllers and workers (XenApp Server and XenDesktop VDIs). Because I learned last month’s that with 7.x and the FMA architecture it’s really possible that an environment contains a number of different VDA versions, I also added this info. And for troubleshooting reason, I assumed that it would be helpful to have also the hypervisor host information on this output.
The code is on GitHub:
https://github.com/sacha81/XA-and-XD-HealthCheck/
For Bug Reports or Feature Request please use GitHub, of course, you can also contribute on this code!
sachathomet goes GitHub
Last 11 days I was in Las Vegas on the CTP meetings, Citrix Synergy and at the E2EVC. I get known a few new people and a bunch of ideas, some about Citrix but also how to continue with my Scripts and the community. (Other blog post will follow, maybe here or on the myCUGC site)
It’s not easy to manage all my Scripts, versions, bugs and feature request so I followed the hint of some people at Synergy and decided to push my larger Scripts to GitHub.
You can see now all my Scripts in GitHub repositories under https://github.com/sacha81 – feel free to contribute!
Currently I have started with my two most popular Scripts:
- Citrix PVS HealthCheck Blog:Happy New Script – PVS 7.7 HealthCheck
- Citrix FMA XenApp/XenDesktop HealthCheck Blog: XD & XA FMA (7.x) HealthCheck – Oops!… I Did It Again
Please be gentle to me if you are more experienced with GitHub than me, what is for sure if you work already more than 5 days with GitHub…. I’m really not the Software developer so I’m making baby steps with this repository thing. Hint’s are always appreciated.
Please use from now for feature-requests and bug reports the GitHub (issues) and no more the comment function in the blog.
victim of a good reputation – Low free pooled XenDesktops
The Citrix Director is not so bad, and with Version 7.7 it is still better because now it’s possible to send email alerts. But one problem I still have … our provided pooled XenDesktop which are used for remote access with private computers are victim of a good reputation … this means a good word-of-mouth advertising in our company more and more people are tempted to use it … and we need to know when the number of free pooled desktop is low. And no I won’t go the read the numbers every day in director or Citrix Studio.
So I created a small script which send me an email as soon a defined threshold of free desktops is reached:
The code is on GitHub:
https://github.com/sacha81/Citrix-XD-Alert-low-free-desktops
Happy New Script – PVS 7.7 HealthCheck
We are close to the New Year 2016 and I want to wish you all the best for 2016!
I’m already happy now, because I can publish some hours after the PVS 7.7 release from Citrix this Script:
Today Citrix released XenApp/XenDesktop 7.7 and Citrix Provisioning Services 7.7. There are a bunch of new features, but for me the most important thing, beside of the Win10 support, is
…. drum roll ….
the new PVS PowerShell API. PoSh with PVS 7.6 and below was a pain … To know what else is new in PVS look here: PVS 7.7 New in this release
Now PVS comes with a real PoSh interface which gave more back than a bundle of strings. I had the chance to play around with PVS 7.7 Tech Preview and so here you have already the PVS HealthCheck Script for Version 7.7 in a complete new developed version:

If you have a feature request or a bug report please post it direct on GitHub.
This version doesn’t work with PVS 7.6 and below, if you have an older version than 7.7 take this script: Citrix PVS HealthCheck
Update 11.04.2016: Performance-Improvement, Change the order of the table, all the VDI status now at the end.
Update 09.05.2016: Bugfix & Input from Jay, get CPU/Memory/Disk usage of PVS.
Update 27.05.2016: Now my Script is on GitHub
I’m an absolute GitHub newbie … for this reason I leave it still also here as a download until I’m really comfortable with GitHub.
The code is on GitHub:
Control MyStrom smart plug by a trigger (ifttt or octoblu)
 Some weeks ago I bought my first smart plug from MyStrom. If you are living in Switzerland you have only a limited choice of smart plugs because of the non EU standard plug (T13).
MyStrom is pretty cool because it mets almost all my requirement, there is a possibility to measure to power consumption within two rates (day and night), it’s controllable with the mobile phone app and there is a nice web interface.
But one thing I miss, I cannot react to triggers and power of the smart plug on a defined event. Like already in an earlier post mentioned there is a REST API which allows to control the plug from the internal network. (See Another LaMetric IoT script – power control)
Last day’s I just found the API documentation which allows to control the MyStrom out of the cloud:
https://mystrom.ch/mobile/
So I have now all to connect this Thing to the Internet and react on a trigger.
Possibility 1: The everything imaginable way,
MyStrom and Octoblu
 +
+ 
If you are using Octoblu beta, which is currently available for everyone for free you can create very intelligent workflows to control your smart plug. You can react to twitter and power of or on depending what is twittered, you can power off your heater as soon a temperature is reached, you can stop charge as soon your device have a defined state of charge.
The Things you connect use with Octoblu are nearly infinite.

Octoblu is for advanced use, and to be honest I’m also on the learning phase! I do not describe here more details for this case. There are a lot of sample blueprints on https://www.octoblu.com . Octoblu was acquired by Citrix in 2015.
Possibility 2: The easy way,
MyStrom and IFTTT
+ 
This way is suitable for “Home use” and for people who only want to create a simple workflow where a trigger initiate for example a Power On or Power Of of the smart plug.
All what you need is a Control-Script on a Webserver with PHP on the Internet, and a IFTTT account.
How it works: The script is very simple, it just handle the authentication process on the API, read the AuthToken out of the JSON answer and Push out the payload with the AuthToken. IFTTT just take the trigger and call the script with the username, passwort and the payload which you can build from the API
Example: I want to control my smart plug by twitter, if I twitter #lightsoff
Step 1:
Take this script and put it on your webserver:
<!--?php


/*
V0.1 by Sacha Thomet, www.appcloud.ch, 12-2015


This script can be used to control the MyStrom power outlet with IFTTT.
In IFTTT you need to take the MAKER component to make a web request.


The script must be called with 3 parameters:
- Your MyStrom username (email)
- Your MyStrom password
- the decided payload
 e.g. ../device/switch?on=true%id=64002D012305 to turn on your device with Mac 64002D012305


 Documentation of all API calls: https://mystrom.ch/mobile/
 Attention! You need to replace in your payload all "&" with a "%" !!


 Example:
 myStromAuthenticator.php?email=joe.doe@gmail.com&password=mysecreatword&payload=https://mystrom.ch/mobile/device/switch?on=true%id=64002D012305


*/


//create variables from parameter
$email = ($_GET["email"]);
$password = ($_GET["password"]);
$payload = ($_GET["payload"]);


//myStrom host with the parameters to gather the AuthToken
$host = "https://mystrom.ch/mobile/auth?email=$email&password=$password";
$filestring = file_get_contents($host);


//format the AuthToken that only the token remain from the JSON Answer
$startpos = 0;
while($pos = strpos($filestring, "authToken", $startpos))
{
 $string = substr($filestring, $pos, strpos($filestring, "name", $pos + 1) - $pos);


 //echo $string. " ";
 $newstring = str_replace("authToken","","$string");
 $newstring2 = str_replace('"',"",$newstring);
 $newstring3 = str_replace(":","","$newstring2");
 $authCode = str_replace(",","","$newstring3");


 echo " AuthCode is $authCode
" ;


 $startpos = $pos + 1;
}


// Because & cannot submitted in a $_GET we subsitute it with a %
$correctpayload = str_replace("%","&","$payload");


echo "Full payload is: $correctpayload&authToken=$authCode";


$fullpayload = "$correctpayload&authToken=$authCode";
$payloadString = file_get_contents($fullpayload);


?-->
Step 2:
Create a recipe on IFTTT, use Twitter as Trigger and Maker as Action. In maker you create your request:
[yourwebserver]myStromAuthenticator.php?email=[youraccountemail]&password[yourpassword]&payload=[yourpayload]
e.g. the payload to turn of the device with Mac 64002D012325 is: https://mystrom.ch/mobile/device/switch?on=false%id=64002D012325
The result should be that:

You create 2 of those recipies, one to Power On and one to Power Off
Now you can twitter you defined hashtags to control your smart plug.
Another LaMetric IoT script – power control
Because I have currently holiday here is another post which is not related to virtualization …
I combined my new “gadgets” the LaMetric time and my new wifi Smart-Plug from MyStrom. The goal was to report the current power consumption of power plug and the possibility to control the plug with the smart ticker.
MyStrom has a very straight forward API (https://mystrom.ch/en/mystrom-api), and the possibility to create apps for LaMetric is pretty easy what I’ve already mentioned in an past blog post.
All what is needed to implement this solution is:
- a web server which can parse PHP
- two small scripts
- and a private app for LaMetric
This is the script to see the current power consumption:
{
    "frames": [
        {
            "index": 0,
            "text": " <!--?php //$host = "http://192.168.1.59/report"; //Call with parameter, e.g.: http://192.168.1.20/LaMetric/myStrom.php?host=192.168.1.59 $host = "http://" . $_GET["host"] . "/report"; $filestring = file_get_contents($host); $startpos = 0; while($pos = strpos($filestring, "\"power\"", $startpos)) { $string = substr($filestring, $pos, strpos($filestring, ",", $pos + 1) - $pos); //echo $string. " "; $newstring = str_replace("\"power\": ","","$string"); echo round($newstring, 2); $startpos = $pos + 1; } ?--> Watt",
            "icon": "i1692"
        }
    ]
}
I just read the content from the API, which is already in JSON format, but I reformat it that it is in that way which I need to bring it to the LaMetric.
This is the script to control the power outlet:
<!--?php $host = "http://" . $_GET["host"] . "/report"; $filestring = file_get_contents($host); $startpos = 0; while($pos = strpos($filestring, "relay", $startpos)) { $string = substr($filestring, $pos, strpos($filestring, "}", $pos + 1) - $pos); $newstring = str_replace("relay\": ","","$string"); //echo $newstring; $startpos = $pos + 1; } $newstring = str_replace(chr(13), "", $newstring); if ($newstring == "false ") { echo "Ist ausgeschaltet, wird nun eingeschaltet"; $URL = "http://" . $_GET["host"] . "/relay?state=1"; $data = file_get_contents($URL); } else { echo "Ist eingeschaltet, wird nun ausgeschaltet"; $URL = "http://" . $_GET["host"] . "/relay?state=0"; $data = file_get_contents($URL); } ?-->
And the LaMetric private app:
This simple poll app call the script on the webserver (192.168.1.20) with the parameter of the MyStrom plug (192.168.1.59).
On button action the controller script is launched with change the status (off to on or visa verse)

(192.168.1.59 is the ip of my Power outlet. 192.168.1.20 is the address of my web server, this can be a raspberry pi or a Synology.)
Monitor you Profile directories
Since I had worked as a Citrix administrator the size of the profile directories was always a contemporary issue. It’s a fact that with new technologies like Citrix User Profile Manager the possibilities are grown and the life is easier with exclusion lists and profile streaming features. But it’s still a topic to consider if you are a Citrix admin or system engineer. I worked in former company with tools like TreeSize (https://www.jam-software.com/treesize/) or WinDir Stat (http://windirstat.info). But in some company they wont to spend money for tools which is only usable for one administrator or they don’t trust to OpenSource software (TreeSize).
I have the approach to solve every possible problem with on-board tools. So I created now a small script what give me the possibility to check my Profile directory with one recursive level so that I get each Size of a Profile within his subdirectories.:
#==============================================================================================
# Created on: 10.2015 Version: 0.3
# Created by: Sacha Thomet
# Filename: GetSubdirSizes.ps1
#
#
# Description: Collect Size of Dir's and Subsirs
#
# Prerequisite: None
#
# Call by : Manual
#
# Change Log:
# V0.1 first version
# V0.2 only 1 recursive subfolder
# V0.3 corrections of calculation
#
#==============================================================================================

$path = "\localhostC$tempprofiles"
$top = "4000"
$outputpath = "C:tempSubdirSize-Report.txt"

Function Get-FolderSize
{
 $Sizes = 0
 ForEach ($Item in (Get-ChildItem $Path))
 {
 If ($Item.PSIsContainer) {$Sizes = (Get-ChildItem $path"$Item" -recurse | Measure-Object -property length -sum).sum}
 Else {Write-Host "No Subfolder"}

 $SizeFormated = "{0:N2}" -f ($Sizes/1MB)
 New-Object PSObject -Property @{'Folder'=$Item;'Size'=$SizeFormated }
 }
}
$outfile = Get-FolderSize $path | sort -property Size –Descending |select -first $top
$outfile | out-file $outputpath
echo $outfile
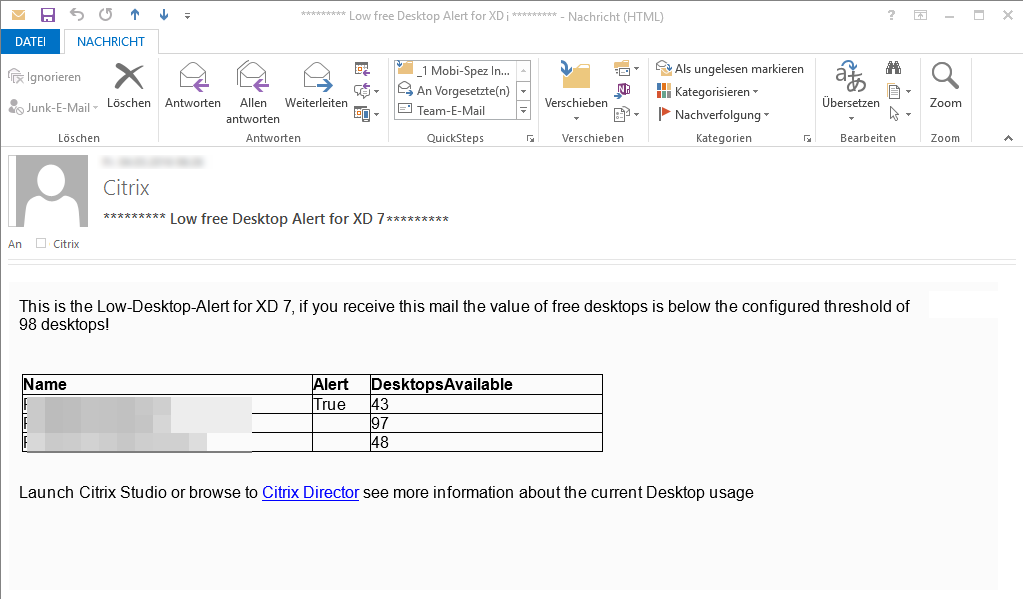
PoSh Script who alert me if I’m running out of pooled Desktops
Just a small one, last days I’ve created a small script who alert me if I’m running out of pooled Desktops.
If you run this script at regular intervals you will receive an email as soon you have less desktops free than you defined as threshold:

#==============================================================================================
# Created on: 08.2015 Version: 0.2
# Created by: Sacha Thomet
# File name: Citrix-XenDesktop-Alert-low-free-desktops.ps1
#
# Description: Check for Free Desktops in DeliveryGroups
#
# Prerequisite: None
#
# Call by : Scheduled Task e.g every 10 minutes
#
# Changelog:
# V0.1 Initial Version, create report file from array FreeDesktopReport and attach this to the email.
# V0.2 Change from txt-file to formatted HTML-Mail
#
#==============================================================================================
if ((Get-PSSnapin "Citrix.Common.Commands" -EA silentlycontinue) -eq $null) {
try { Add-PSSnapin Citrix.* -ErrorAction Stop }
catch { write-error "Error Citrix.* Powershell snapin"; Return }
}
# Change the below variables to suit your environment
#==============================================================================================
# Variables what should be changed according your environment and wishes
$DeliveryGroups = @("Win7-Desktops","Win10-Desktops")
$minDesktops = 10
$directoraddress="http://citrixdirector.mycompany.ch"
$EnvironmentName="Production XenDesktop"
# E-mail report details
$emailFrom = "citrix@mycompany.ch"
$emailTo = "citrix@mycompany.ch"
$smtpServer = "mailrelay.mycompany.ch"
#=======DONT CHANGE BELOW HERE =======================================================================================
$mailbody = $mailbody + "&lt;!DOCTYPE html&gt;"
$mailbody = $mailbody + "&lt;html&gt;"
$mailbody = $mailbody + "&lt;head&gt;"
$mailbody = $mailbody + "&lt;style&gt;"
$mailbody = $mailbody + "BODY{background-color:#fbfbfb; font-family: Arial;}"
$mailbody = $mailbody + "TABLE{border-width: 1px;border-style: solid;border-color: black;border-collapse: collapse; width:60%; }"
$mailbody = $mailbody + "TH{border-width: 1px;padding: 0px;border-style: solid;border-color: black; text-align:left;}"
$mailbody = $mailbody + "TD{border-width: 1px;padding: 0px;border-style: solid;border-color: black;}"
$mailbody = $mailbody + "&lt;/style&gt;"
$mailbody = $mailbody + "&lt;/head&gt;"
$mailbody = $mailbody + "&lt;body&gt;"
$mailbody = $mailbody + "This is the Low-Desktop-Alert for $EnvironmentName, if you receive this mail the value of free desktops is below the configured threshold of $minDesktops desktops! &lt;br&gt;&lt;br&gt;"
$FreeDesktopReport = @()
foreach($dg in $DeliveryGroups)
{
$desktops = Get-BrokerDesktopGroup | where {$_.Name -eq $dg }
$CurrentDeliveryGroup = "" | Select-Object Name, Alert, DesktopsAvailable
# Write Array Values
$CurrentDeliveryGroup.Name = $dg
$CurrentDeliveryGroup.DesktopsAvailable = $desktops.DesktopsAvailable
if ($desktops.DesktopsAvailable -lt $minDesktops )
{
Write-Host "Number of free desktops to low for DeliveryGroup $dg, sending email"
# Add Line to Report
$CurrentDeliveryGroup.alert = "True"
}
$FreeDesktopReport += $CurrentDeliveryGroup
}
$mailbody += $FreeDesktopReport | ConvertTo-Html
$mailbody += "&lt;br&gt;&lt;br&gt;Launch Citrix Studio or browse to &lt;a href=$directoraddress&gt;Citrix Director&lt;/a&gt; see more information about the current Desktop usage&lt;br&gt;"
$mailbody = $mailbody + "&lt;body&gt;"
$mailbody = $mailbody + "&lt;/html&gt;"
# If any record raises an alert, send an email.
if (($FreeDesktopReport | where {$_.alert -eq "True"}) -ne $null) {Send-MailMessage -to $emailTo -from $emailFrom -subject "********* Low free Desktop Alert for $EnvironmentName *********" -Body $mailbody -BodyAsHtml -SmtpServer $smtpServer }
Or download the Script here

