IoT
My Smart Home – Chapter 2: Home Assistant
After my smart mirror project which was exciting, I can still only see the values of the integrated sensors on the mirror. The problem that I can’t control my smart devices from one place still exists.
The conglomeration of smart devices in my home is very various, I need to work with something which is open for almost everything imaginable.
On Facebook, I saw a post of an acquaintance who adverted for Home Assistant (home-assistant.io). Home Assistant is an open-source home automation platform running on Python 3. Track and control all devices at home and automate control. Perfect to run on a Raspberry Pi.
Hass.io (Home Assistant) is still in development but works already good. I’ve started with version 0.48 or so and now in December 2017 we are on 0.60.
First I started with Hass.io on a Raspberry Pi 3, but then I’ve upgraded my Synology NAS and the new one is able to run Docker, so I moved my Home Assistant to a Container on my NAS.
I don’t write here now a post how to install and run Home Assistant, that you can find in Getting started on hass.io, the intention of this post is a short Intro for Home Assistant with some hints for the practice.
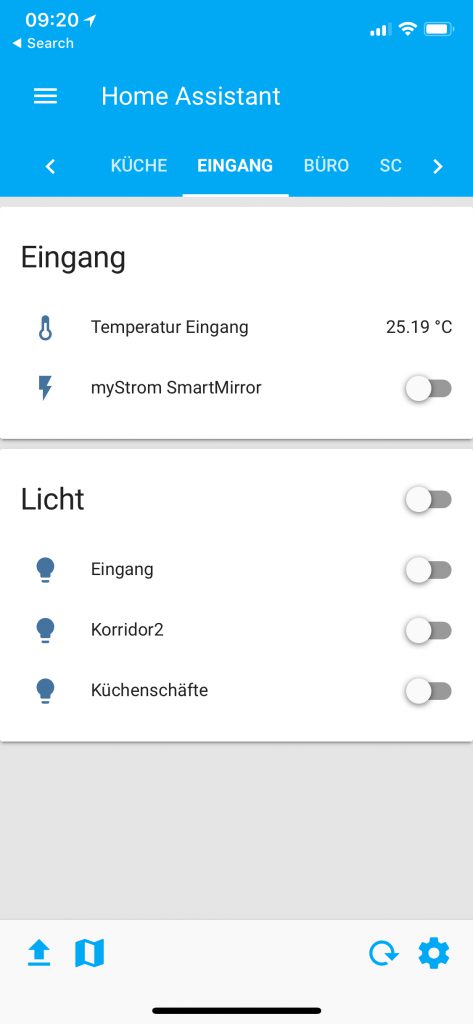
For Hass.io there is also a mobile app, you can use the App if you are in the same network as your Home Assistant server or you have a VPN connection in this network. It’s also possible to expose the server to the internet, it contains all you need for that like duck dns and Let’s Encrypt. But I won’t do that for security consideration.
Devices and Components
Home Assistant has a very broad range of supported smart devices, I added the following devices to my system:
- Philips Hue
- MyStrom (Bulb, Wifi Switch & Button.)
- Different Sensors from WirelessTag
- Tesla Model S (want buy one?, use my referral code)
- Netatmo Weather Station (Amazon Link)
- UniFi Controller
- Arlo Webcam (Amazon Link)
- Philips Webcam
- Apple TV
- Sonos One (Amazon Link)
- Logitech Harmony Hub (Amazon Link)
- Some Devices in my Network can be started with Wake on Lan.
A short demo of how that looks on my environment:
Automation
Before I used Home Assistant I automated some of my smart devices with IFTTT, with hass.io I can now do that “On Premises”.
I created the following “recipes” for my home automation:
- If the IKEA lamp in my living room turns on, also turn on the lights in my vitrine (LED plugged in a MyStrom Smart Plug):

- If my UniFi controller doesn’t see any Wifi Mac address of the mobile phones of my family members, the automation “Away-Mode” turns on. This procedure powers off some Smart Plugs, bring my Sonos Player to pause, and all Hue lights will be turned off.
In contrast to IFTTT it’s possible with hass.io to combine things almost indefinitely. It’s possible to define so-called Conditions.
Helpful Hints
If you try Home Assistant and you start to create and modify your *.yaml files, really use a text editor which shows you invisible characters! Python is very fussy for syntax errors even when only an invisible character.
Make backup from your files before you modify it, this can help to avoid some frustration.
If you intend to add a MyStrom Smart Button, I found out that this doesn’t work currently if your Home Assistant Web GUI is protected with a password.
Conclusion
A big benefit of Home Assistant is that it’s an open system with a large developer community, there are many components integrated and it’s possible to integrate by your own.
The downside of Home Assistant is that’s currently not yet a solution for an Enduser without any IT skills. More and more it’s now configurable via Web GUI but without any IT knowledge, it’s impossible to manage it.
+ Command center for your Smart Home
+ Cheap
+ Interaction with your smart components is possible
+ many Components integrated
+ App for your mobile phone or tablet computer
+ – Open Source (Open to integrate other things, improve code vs Security)
– Not an End-user product
– Needs Maintenance
A short preview for my third Smart Home article, I will show you something which is also usable for End-Users without IT Knowledge. I know the readers of my blog are mostly IT Pro’s but I’m sure you have also friends who want to play the Smart Home game and have no clue how to start.
Use Octoblu with Amazon Echo as trigger to start A/C on Tesla Model S
It need’s a bit courage as a non native english speaker and with my hard swiss accent it’s maybe awkward … but I’ve done it … my first webcast … you cannot win without a risk 🙂
Goal: Use Amazon echo to start the Air Condition of the Tesla Model S.
21.6.2016, Update to this post:
It’s not so difficult to use Alexa without IFTTT in Octoblu, I just created a flow to ask Alexa what’s the battery level and she tell me the remaining battery in percent:
Details about how to integrate Alexa in octoblu look at this: Use Alexa to kick off automations with Octoblu
By the way: If you don’t have a Tesla but you like to buy one,use my referral Link http://ts.la/sacha3162 and safe 1000.- !
Control MyStrom smart plug by a trigger (ifttt or octoblu)
 Some weeks ago I bought my first smart plug from MyStrom. If you are living in Switzerland you have only a limited choice of smart plugs because of the non EU standard plug (T13).
MyStrom is pretty cool because it mets almost all my requirement, there is a possibility to measure to power consumption within two rates (day and night), it’s controllable with the mobile phone app and there is a nice web interface.
But one thing I miss, I cannot react to triggers and power of the smart plug on a defined event. Like already in an earlier post mentioned there is a REST API which allows to control the plug from the internal network. (See Another LaMetric IoT script – power control)
Last day’s I just found the API documentation which allows to control the MyStrom out of the cloud:
https://mystrom.ch/mobile/
So I have now all to connect this Thing to the Internet and react on a trigger.
Possibility 1: The everything imaginable way,
MyStrom and Octoblu
 +
+ 
If you are using Octoblu beta, which is currently available for everyone for free you can create very intelligent workflows to control your smart plug. You can react to twitter and power of or on depending what is twittered, you can power off your heater as soon a temperature is reached, you can stop charge as soon your device have a defined state of charge.
The Things you connect use with Octoblu are nearly infinite.

Octoblu is for advanced use, and to be honest I’m also on the learning phase! I do not describe here more details for this case. There are a lot of sample blueprints on https://www.octoblu.com . Octoblu was acquired by Citrix in 2015.
Possibility 2: The easy way,
MyStrom and IFTTT
+ 
This way is suitable for “Home use” and for people who only want to create a simple workflow where a trigger initiate for example a Power On or Power Of of the smart plug.
All what you need is a Control-Script on a Webserver with PHP on the Internet, and a IFTTT account.
How it works: The script is very simple, it just handle the authentication process on the API, read the AuthToken out of the JSON answer and Push out the payload with the AuthToken. IFTTT just take the trigger and call the script with the username, passwort and the payload which you can build from the API
Example: I want to control my smart plug by twitter, if I twitter #lightsoff
Step 1:
Take this script and put it on your webserver:
<!--?php


/*
V0.1 by Sacha Thomet, www.appcloud.ch, 12-2015


This script can be used to control the MyStrom power outlet with IFTTT.
In IFTTT you need to take the MAKER component to make a web request.


The script must be called with 3 parameters:
- Your MyStrom username (email)
- Your MyStrom password
- the decided payload
 e.g. ../device/switch?on=true%id=64002D012305 to turn on your device with Mac 64002D012305


 Documentation of all API calls: https://mystrom.ch/mobile/
 Attention! You need to replace in your payload all "&" with a "%" !!


 Example:
 myStromAuthenticator.php?email=joe.doe@gmail.com&password=mysecreatword&payload=https://mystrom.ch/mobile/device/switch?on=true%id=64002D012305


*/


//create variables from parameter
$email = ($_GET["email"]);
$password = ($_GET["password"]);
$payload = ($_GET["payload"]);


//myStrom host with the parameters to gather the AuthToken
$host = "https://mystrom.ch/mobile/auth?email=$email&password=$password";
$filestring = file_get_contents($host);


//format the AuthToken that only the token remain from the JSON Answer
$startpos = 0;
while($pos = strpos($filestring, "authToken", $startpos))
{
 $string = substr($filestring, $pos, strpos($filestring, "name", $pos + 1) - $pos);


 //echo $string. " ";
 $newstring = str_replace("authToken","","$string");
 $newstring2 = str_replace('"',"",$newstring);
 $newstring3 = str_replace(":","","$newstring2");
 $authCode = str_replace(",","","$newstring3");


 echo " AuthCode is $authCode
" ;


 $startpos = $pos + 1;
}


// Because & cannot submitted in a $_GET we subsitute it with a %
$correctpayload = str_replace("%","&","$payload");


echo "Full payload is: $correctpayload&authToken=$authCode";


$fullpayload = "$correctpayload&authToken=$authCode";
$payloadString = file_get_contents($fullpayload);


?-->
Step 2:
Create a recipe on IFTTT, use Twitter as Trigger and Maker as Action. In maker you create your request:
[yourwebserver]myStromAuthenticator.php?email=[youraccountemail]&password[yourpassword]&payload=[yourpayload]
e.g. the payload to turn of the device with Mac 64002D012325 is: https://mystrom.ch/mobile/device/switch?on=false%id=64002D012325
The result should be that:

You create 2 of those recipies, one to Power On and one to Power Off
Now you can twitter you defined hashtags to control your smart plug.
Another LaMetric IoT script – power control
Because I have currently holiday here is another post which is not related to virtualization …
I combined my new “gadgets” the LaMetric time and my new wifi Smart-Plug from MyStrom. The goal was to report the current power consumption of power plug and the possibility to control the plug with the smart ticker.
MyStrom has a very straight forward API (https://mystrom.ch/en/mystrom-api), and the possibility to create apps for LaMetric is pretty easy what I’ve already mentioned in an past blog post.
All what is needed to implement this solution is:
- a web server which can parse PHP
- two small scripts
- and a private app for LaMetric
This is the script to see the current power consumption:
{
    "frames": [
        {
            "index": 0,
            "text": " <!--?php //$host = "http://192.168.1.59/report"; //Call with parameter, e.g.: http://192.168.1.20/LaMetric/myStrom.php?host=192.168.1.59 $host = "http://" . $_GET["host"] . "/report"; $filestring = file_get_contents($host); $startpos = 0; while($pos = strpos($filestring, "\"power\"", $startpos)) { $string = substr($filestring, $pos, strpos($filestring, ",", $pos + 1) - $pos); //echo $string. " "; $newstring = str_replace("\"power\": ","","$string"); echo round($newstring, 2); $startpos = $pos + 1; } ?--> Watt",
            "icon": "i1692"
        }
    ]
}
I just read the content from the API, which is already in JSON format, but I reformat it that it is in that way which I need to bring it to the LaMetric.
This is the script to control the power outlet:
<!--?php $host = "http://" . $_GET["host"] . "/report"; $filestring = file_get_contents($host); $startpos = 0; while($pos = strpos($filestring, "relay", $startpos)) { $string = substr($filestring, $pos, strpos($filestring, "}", $pos + 1) - $pos); $newstring = str_replace("relay\": ","","$string"); //echo $newstring; $startpos = $pos + 1; } $newstring = str_replace(chr(13), "", $newstring); if ($newstring == "false ") { echo "Ist ausgeschaltet, wird nun eingeschaltet"; $URL = "http://" . $_GET["host"] . "/relay?state=1"; $data = file_get_contents($URL); } else { echo "Ist eingeschaltet, wird nun ausgeschaltet"; $URL = "http://" . $_GET["host"] . "/relay?state=0"; $data = file_get_contents($URL); } ?-->
And the LaMetric private app:
This simple poll app call the script on the webserver (192.168.1.20) with the parameter of the MyStrom plug (192.168.1.59).
On button action the controller script is launched with change the status (off to on or visa verse)

(192.168.1.59 is the ip of my Power outlet. 192.168.1.20 is the address of my web server, this can be a raspberry pi or a Synology.)
IoT, LaMetric and mouse issues …
In summer 2014 I became a backer for the Kickstarter project LaMetric. LaMetric was advertised as a smart ticker for life and business. To be honest the Internet of Things (IoT) topic was not so present for me in summer 2014 and I just decided to spend some money for a cool gadget.
Last week I finally received my LaMetric Time and today I need to say it’s one of the coolest gadget I bought in the last months. With the acquisition of Octoblu, what Citrix made early this year and promoted on Citrix Synergy (especially on the GeekSpeak Tonight …) I’m now more aware of IoT an it’s possibilities!
LaMetric is the perfect IoT output device!
First LaMetric app
The creation of apps is pretty easy! On the LaMetric developper portal you can create your push or poll apps. With push you can transmit data to the LaMetric servers in JSON code. W ith pull it’s also easy, you just need a webserver on which you have a file in the correct format.
On this way I created the EuroMillions app which display the current Jackpot. The data are fetched from www.euro-millions.com and formatted with a small and simple PHP script:
{
"frames": [
{
"index": 0,
"text": "<?php
$host = "http://www.euro-millions.com";
$filestring = file_get_contents($host);
$startpos = 0;
// <div class="est-jackpot">&euro;30<span class="amount">Million</span></div>
while($pos = strpos($filestring, ">&euro;", $startpos))
{
$string = substr($filestring, $pos, strpos($filestring, "<span class=", $pos + 1) - $pos);
//echo $string. " ";
echo str_replace(">&euro;","","$string");
$startpos = $pos + 1;
}
?> Millions estimated in next Jackpot",
"icon": "i616"
}
]
}
Result:

First IoT LaMetric Project
Problem
I’m living in an old farmhouse which is converted with some apartments, but it’s still a old house with a lot of wood. And the old problems … mouses. So I have now since some weeks 4 mouse traps installed, not the killing traps, only those which able me to take the mouse out of my apartment.
Problem: Every morning I need to check all mouse traps, because the traps are hidden positioned an annoying daily work. And with the risk that the mouse need to wait hours until I find them.
Concept
Now the concept of my first IoT project is to get alerted as soon a mouse get in a trap.
I want to solve this with:
- a modified mouse trap with an attached window/door sensor, something like this http://store.wirelesstag.net/products/reed-kumosensor
- an Octoblu workflow
- and LaMetric as Output device.
The result must be this:

Implementation
Need some hours … I have to learn how to handle octoblu and learn a bit of JSON.

