XenDesktop
How I try to help the community as a Citrix CTP
Now it’s already 2,5 years since I was elected as a Citrix Technology Professional. Becoming a CTP was a really big honor for me, but I didn’t write a long blog post about that.
Maybe because I was shocked about the fact I was chosen or I was just afraid because more eyes from the Community and Citrites are looking to me and I fear I’ll not find the right words.
I think now I’m able to write a short retrospective about this time, no I don’t say that because I intend to step back, I’m still happy in this role 🙂 But who knows if I will be active enough to get re-elected.
According to the Citrix Website (https://www.citrix.com/community/ctp) individuals are eligible to be a CTP when they prove their knowledge in Citrix products and invest a lot of time: “The CTP Program recognizes the contributions of individuals who have invested a significant amount of time and resources to become experts in Citrix products and solutions.”
Honestly, after being elected as CTP, I felt a bit under pressure to deliver new blog posts and to speak at conferences. Both are something that I like to do, but it’s only easy when I really have something to show or say. The Health Check automation was something and my early adopter experience with Windows 10, but I think these topics are now more or less stale. And for the blog posts when I have time to write it down…
The value of being a CTP is that I have access to Beta and EAR sources of the products, having a free pass to Citrix Synergy and the best, direct access to the Product Management. Besides all the CTP goodies, there is also liability and duties. Maybe not all people out there are aware of that. A CTP is not the Extension of the Citrix marketing department! But in my opinion, a CTP should be a communication channel between Citrix and their customers and more from the customer in the direction of Citrix.
To get elected as a CTP is not an easy thing, but also to stay a CTP needs effort! To make the grade for the CTP Program there are multiple possible activities. There are 1-2 online meetings with Product Management which takes about 1 hour. Also, there are two in-person meetings which take 2-3 days each.
So, if you aim to be a CTP, please think that it needs a bunch of spare time to satisfy the needs! I’m doing this partially in my free time and my employer “Die Mobiliar” supports me and gives me time for the in-person meetings. Also, I have support from my wife, my family and my friends and colleagues at Die Mobiliar. At this place THANK YOU!
Besides the CTP Program, I’m also active for the CUGC, on one hand as a local leader here in Switzerland but also in the CUGC Steering Committee. I think this is kind of “double burden” but also there were good synergies to combine these two or three roles.
I sometimes was asked “What can you accomplish as a CTP?” and now I can see that I’m really able to help Citrix and the Community to bring products in better shape to the customer needs. I posted some Feature Requests and those were implemented in the last months. These are only very little features, but for me, the fact that they implemented them was a big thing!
Here are some examples:
- VDI Battery Indicator:
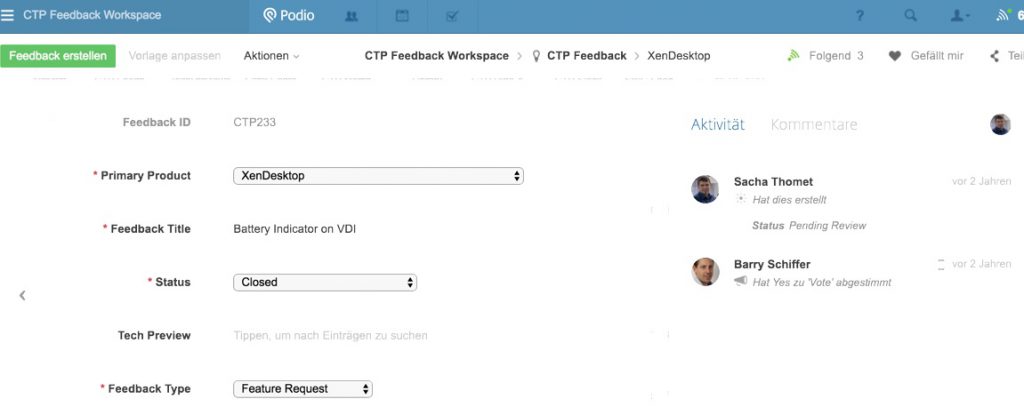
this feature was implemented in Virtual Desktops (XenDesktop) 7.18 !
- Limit Number of Desktops in a Site
The next feature request I submitted because my SwissCUGC fellow leader Stefan Beckmann (https://www.beckmann.ch / @alphasteff)had an issue with the missing feature in version 7.x of Virtual Apps & Desktops (XenApp/XenDesktop):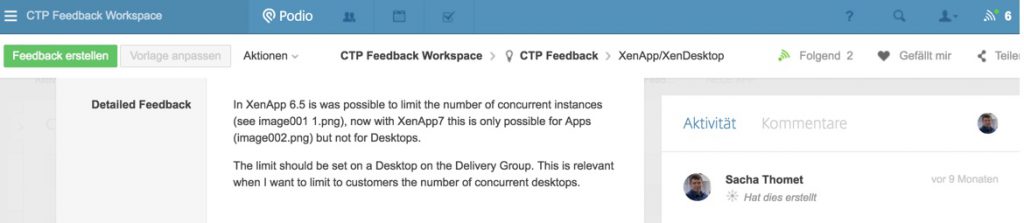 This is now implemented in version 1808 (former version naming would say 7.19). (If you want to use this feature, this is currently available in command line not in the Studio)
 - StoreFront Logout without closing Browser
Also, this article describes the impact of a feature request from me: http://blog.sachathomet.ch/2017/01/03/storefront-allowreloginwithoutbrowserclose/
- And also, the missing Windows 10 disconnect button I repeatedly requested from Product Management – but guess I was not the only one … 🙂 A fix you can find here https://support.citrix.com/article/CTX225970 and I hope soon it will be implemented in the standard VDA
I hope now you have a bit an idea of the role of a Citrix Technology Professional and know that it’s more than just a title like a certification like CCE-V or so. There are a lot of brilliant CTPs, see the full list here: https://www.citrix.com/community/ctp/awardees.html or follow them on Twitter, Citrix has a complete list: https://twitter.com/citrix/lists/ctps
XenApp & XenDesktop Avoid CEIP
Already in February when I updated my Citrix environment to 7.13 I’ve seen that it’s difficult to avoid call home on the license server from now
, I made a short message on twitter:

Now when I updated to 7.14 I had the issue again, because my license server and my delivery controller cannot communicate outside there is also a ugly message in Studio:

It’s pretty easy to complete turn off Customer Experience Improvement Program (CEIP):
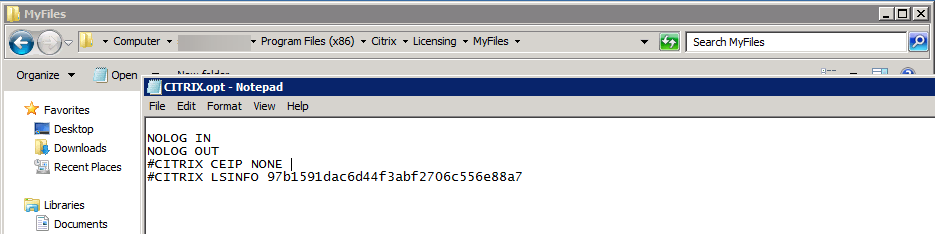
Just add this line to the Citrix.opt file on the license server:
#CITRIX CEIP NONE
Win10 to Win10 with a Citrix VDA
Intro – my relationship with Windows 10
The company I’m working for, Die Mobiliar, started early with Windows 10, we rolled out in spring 2016 Windows 10 to all our physical devices and also to our virtual Desktops. We have two different kind of VDIs, pooled Win10 Desktops provided by Citrix PVS and also classical installed dedicated VDIs. Both with Citrix XenDesktop 7.x.
To be in the role as early-adopter with such a new operating systems is interesting but also nerve-racking on some days… Especially when you add Citrix XenDesktop on top to Windows 10 and then also special requirements like physical and virtual Smart Cards.
I talked about this adventure on E2EVC in Rome: The stony road of a VDI migration from Win7 to Win10
Next chapter
Now our story goes into the next round, we installed Windows 10 last year with the 1511 Release and we want to go now to the anniversary update (1607). For our pooled desktops it’s no question, fresh install on the new build. But an fresh install of the dedicated desktops where users have installed their own stuff will get me into big troubles … it’s really not an option!
I was curious who is in the same boat, so I created this poll:
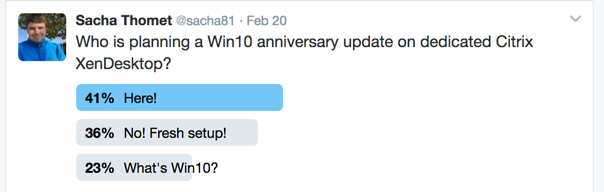
36% are doing fresh install of dedicated desktops? Wow … BOFH? 🙂
I tell you now 2 secrets:
- It’s not possible to update Windows 10 from one version to the other when a Citrix Virtual Desktop Agent (VDA) is installed!
- Uninstall of Citrix VDA fails most of the times!
Good News: Citrix knows that uninstall of the VDA is a problem, for that reason there exists the
VDACleanupUtility.exe (https://support.citrix.com/article/CTX209255)
Bad News: VDACleanupUtility.exe (VCU) should run as a User, need a reboot and login with the same user, what means it’s not in a easy way to automate that.
With some hints of the CTP colleague Stephane Thirion and my collegues at “Die Mobiliar” I was able to create this guide to automate the Windows 10 Update with an automated removal of the VDA.
Task Sequence for SCCM
We are doing this with Microsoft System Center but with the following infos it’s also possible to fulfil this challenge with other ESDs.
Upgrade Steps – Overview 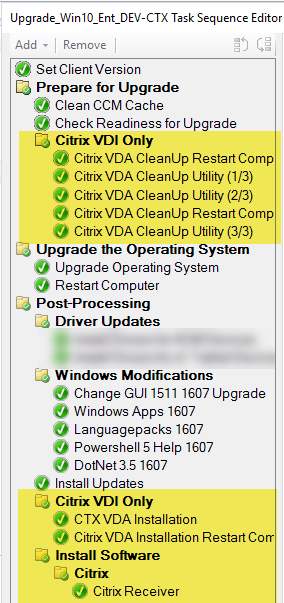 |
The Citrix VDI specific things highlighted in yellow, in this guide I’ll focus on that. We are using one task sequence to update all our Windows 10 installation, thats the reason we need to made a decision if the installation is a VDI or not.
After the OS upgrade we just install the VDA again with our existing software package. Because the Windows upgrade kills the Citrix receiver we also re-install the receiver at the end. The really hard part is the proper automated removal from the VDA, and thats where I go a bit into the deep in this article. |
| VDI or not – thats the question Because we will use one TaskSequence for Win10 with and whiteout Citrix VDA we just check if the VDA is installed, we are doing that by query the Key which has been written by the Software package for VDA |
 |
| A reboot to start is always smart
Sometimes the VDACleanupUtility ask for a reboot, it’s good to start with a reboot before any other steps are done. |
 |
| first step of the VDA removal
The VDACleanupUtility should be started in silent mode and with a suppressed reboot:
The VDACleanupUtility.exe is the only thing in the Package you see on the screenshot. |
 |
|
Remove an action which would be done after the suppressed reboot in order of the VCU
|
 |
| Now you can reboot |  |
|
Start the VCU again this time with the switch silent and reboot – reboot doesn’t mean that it will do a reboot, it’s just the info for VCU that it’s now in phase after the reboot
|
 |
| Now do all the Windows Upgrade steps you want to do, here you also need to think about drivers or in virtualized environments XenTools, VMwareTools, etc. |
|
| As a next Step install the VDA again |  |
| Re-install the Citrix Receiver
Update of Win10 will destroy your Citrix Receiver installation, for this reason install it again at the end |
 |
I want to thank here to Stephane Thirion (https://www.archy.net) for the hints about automate the uninstall of the VDA. Also thanks to my colleagues Stefan Moser and Thomas Hahnel at Die Mobiliar with more Knowhow about SCCM Task Sequences and patience on testing.
Update Fall 2017:
The Version of the Cleanup tool in September 2017 is able to run in unattend mode, see https://support.citrix.com/article/CTX209255 .
Also I’ve found out that the Update from 1607 to 1703 or 1709 works even when a VDA is installed.
Update November 2017:
Now exists and article by Citrix: “How to Run the VDA Cleanup Utility with SCCM Task Sequences”: https://support.citrix.com/article/CTX229801
PowerManagement for dedicated Citrix desktops? Yes with Tags!
Are you using Tags in your XenApp & XenDesktop environment? Maybe you should. Tags to resources, in my case desktops can be very powerful especially in combination with PoSh scripts. You can do actions for machines depending on the tag. Of course you also can use tags to filter Citrix policies on it, also useful.
I had the Problem that I have a delivery group with dedicated Win10 desktops so for dedicated desktops there is no power management. Usually it’s also not needed because if a user launch a Citrix Session over Storefront the machine get’s powered on. The problem in my case, sometimes users connects on an other ways than Citrix to his desktop, so this built-it construct doesn’t work. So if they shutdown their virtual Desktop they can newer ever access it until an admin power it on over director or studio.
My solution to this was, I tagged this special user machines with a tag “AlwaysOnline” in Studio and I wrote this small script which runs every 15 minutes:
param([string]$tags=$(throw "Tag parameter is required"), [string]$poweroperation=$(throw "Power operaton parameter is required"))
#==============================================================================================
# Created on: 09.2016 Version: 0.2
# Created by: Sacha Thomet
# File name: PowerOperation-DependingMachineTags.ps1
#
# Description:  This is a Powershell to change the PowerState of VDI's or XenApp Servers in
#               a PowerManaged XenDesktop 7.x environment accodring to Tags.
#
# Prerequisite: None, a XenDesktop Controller with according privileges necessary
#
# Call by : Manual  or Scheduled Task
#==============================================================================================
# Load only the snap-ins, which are used
if ((Get-PSSnapin "Citrix.Broker.Admin.*" -EA silentlycontinue) -eq $null) {
try { Add-PSSnapin Citrix.Broker.Admin.* -ErrorAction Stop }
catch { write-error "Error Get-PSSnapin Citrix.Broker.Admin.* Powershell snapin"; Return }
}
# Change the below variables to suit your environment
#==============================================================================================


$maxmachines = "1000" # as default only 250 records, this increase it to 1000
#$tags = "AlwaysOnline" # if you comment out the param line you can have the tag here
#$poweroperation = "TurnOn"  # if you comment out the param line you can have the poweroperation here


$machines = Get-BrokerMachine -MaxRecordCount $maxmachines | Where-Object {$_.tags -eq $tags }


foreach($machine in $machines)
{
$machinename = $machine | %{ $_.MachineName }
Write-Host "Action $poweroperation will be performed for $machinename  "
New-BrokerHostingPowerAction  -Action $poweroperation -MachineName $machinename
}
I know I know, this is not a common use case, but the script construct show what is possible with tags … there are almost unlimited possibility to cover special cases with tags.
My example Script on GitHub: PowerOperation-DependingMachineTags.ps1
Finally 1.0 – but never finalized!
In November 2014 I created the blog post about the adaption of the PVS Script for XenApp/XenDesktop 7.x :
XenDesktop & XenApp FMA (7.x) HealthCheck – Oops!… I Did It Again
 Now after almost two years of continuous development on this Script, the XenApp & XenDesktop 7.x Health Check has now Version 1.0.
I started this script in a very basic version and in the meanwhile, a lot of tester and contributors helped to bring this script in this version. Just this year I started with GitHub and it’s surprising, the community who helped is awesome!
Now after a number of 0.x versions, just at the point we introduce the XML configuration file, I can say the version now has deserved the number 1.00.

The big benefit of the configuration in the XML file is in case you have multiple environments with the script you don’t need to edit the header section of the script which has earlier contained the config. On a new version of the script, you just replace the script in your environments and keep the XML file.
The XML file and the script need to be in the same directory and the Name of the XML file needs to be same like the script, e.g:
XA-and-XD-HealthCheck.ps1
XA-and-XD-HealthCheck_Parameters.xml
The XML-Config is introduced to this script by Stefan Beckmann (Twitter: @alphasteff)

The newest version of the script you can find on GitHub:
https://github.com/sacha81/XA-and-XD-HealthCheck

The HTML Output file gained some more input, even it was difficult to decide which feature request to consider and which not.
We check now CPU, Memory and disk space of controllers and workers (XenApp Server and XenDesktop VDIs). Because I learned last month’s that with 7.x and the FMA architecture it’s really possible that an environment contains a number of different VDA versions, I also added this info. And for troubleshooting reason, I assumed that it would be helpful to have also the hypervisor host information on this output.
The code is on GitHub:
https://github.com/sacha81/XA-and-XD-HealthCheck/
For Bug Reports or Feature Request please use GitHub, of course, you can also contribute on this code!
Welcome to the Jungle … of the Citrix Display Modes
When I started to work with Remote Desktop stuff back in 2001 there was one thing definitely not possible, watch a video over a remote connection – not even with Citrix … in the last years a lot of things changed and Citrix improved their protocols and Video codecs from version to version. Today you can do awesome things over a remote connection with Citrix. There are many blogs and articles which shows what’s possible, also for GPU mapping 3D stuff and so on … this blog doesn’t describe how you can get the awesome 3D things out from your VDI. It’s more what if you don’t have special requirements for 3D, you don’t have time to test all possibilities, no time to tune, but you want have the best result according to the Pareto principle.
What do you configure? Nothing? Just default, because default is the setting which will fit for most Users?
Are you aware that default setting on XenApp/XenDesktop until VDA 7.9 was Thinwire with H.264 and since VDA 7.9 it’s Thinwire Plus (Compatibility Encoder)?
You need to consider this fact before you upgrade from 7.x to 7.9! Why they changed that? Is Thinwire Plus better? No! Is Thinwire H.264 better? No!
It’s just different! What are the differences? What I need to choose? It depends! But on what?
This blog post is mainly a comparison between Thinwire Plus and Thinwire H264 !
I’ve done a survey what is preferred for the codec on twitter, funny result 50% vs 50%:

I’ve started some tests, also with the Pareto principle, so no deep scientific background! I tested an internal video in our Intranet of 53 seconds and 1 minute of a YouTube video, Big Buck Bunny, with 25 fps, set to 720p in YouTube. I had an eye on the user experience, means fragments, fluent movie, lip-sync and on the other side on the resource consumption like CPU and bandwidth.
(Advice if you like to do your own tests, Big Buck Bunny is nice to impress people but if you want test for lip-sync take an other movie … the Bunny doesn’t talk much …. )
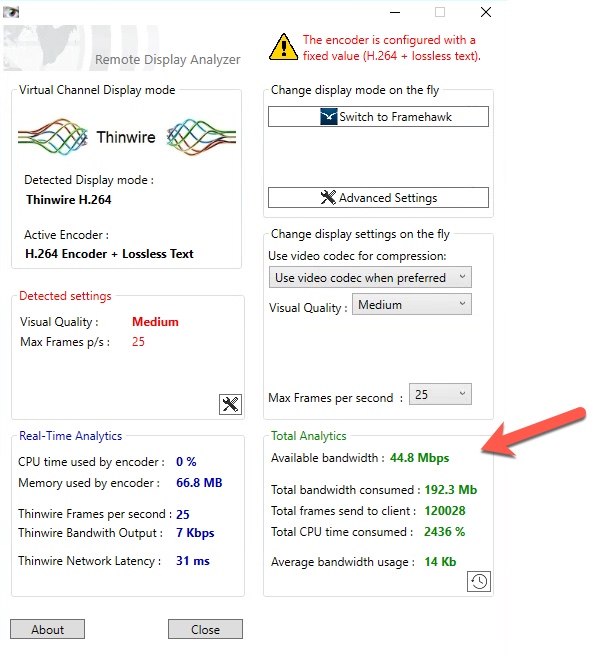
For this tests I used the best, or the only one tool on the market to analyze remote display stuff, the Remote Desktop Analyzer from
Bram Wolfs and Barry Schiffer. In version 1.4 you can do some very helpful statistic reports:
I have tested with:
Virtual Desktop:
- Windows 10, VDA 7.9, 2 vCPU, 4 GB Memory, virtualized on VMWare ESX.
Video Codecs:
- Thinwire +
- Thinwire with H264
Client:
- Mac OSX
- Windows 10
- HDX Raspberry Pi
and thank you to René Bigler (Twitter @dready73 ) to test with those clients:
- ChromeBook
- Linux ThinClient (IGEL)
And this are our Results:


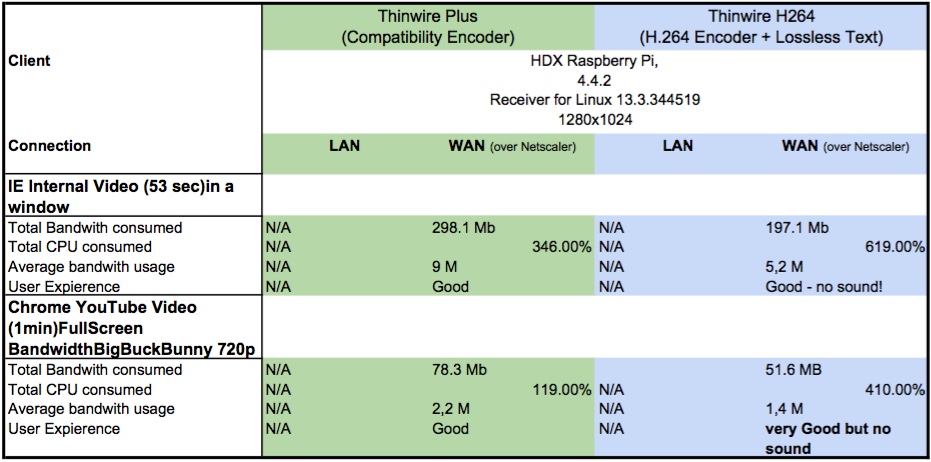

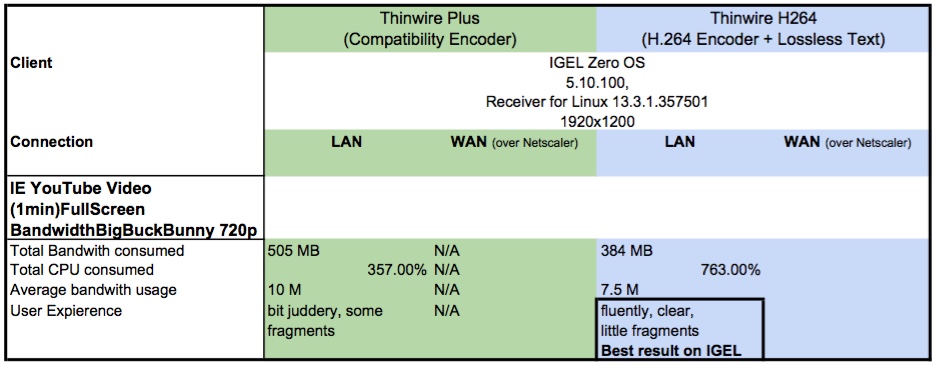

My personal conclusion:
If you have clients like ChromeBook or Windows who can manage H.264 this is your way to go. With limited H264 on the end device you run better with Tw+.
I work in a company which has internal only Windows 10 client devices but from external we have users with BYOD, and MacBooks are not a minority. For this reason I set a Citrix Policy which set all connection not coming over Netscaler to Tw with H.264. So we have internal the best result and external still a good result over the average. What would be the best, is when it’s possible to set a Citrix Policy according to the Client OS which connects.
Recommended Links:
HDX Graphics Modes – Which Policies Apply to DCR/Thinwire/H.264 – An Overview for XenDesktop/XenApp 7.6 FP3: http://support.citrix.com/article/CTX202687
Citrix Display modes: How to configure, what to configure, when to configure: https://bramwolfs.com/2016/02/24/citrix-display-modes-how-to-configure-what-to-configure-when-to-configure
H.264 compression JUL 19 2013 A graphical deep dive into XenDesktop 7 https://bramwolfs.com/tag/h-264-compression
Update 23.9.2016:
An excelent blog post here: Citrix HDX Just Got Smarter…Again https://www.mycugc.org/blog/citrix-hdx-just-got-smarter…again?source=6 a post about selective H264 with XenApp / XenDesktop 7.11
victim of a good reputation – Low free pooled XenDesktops
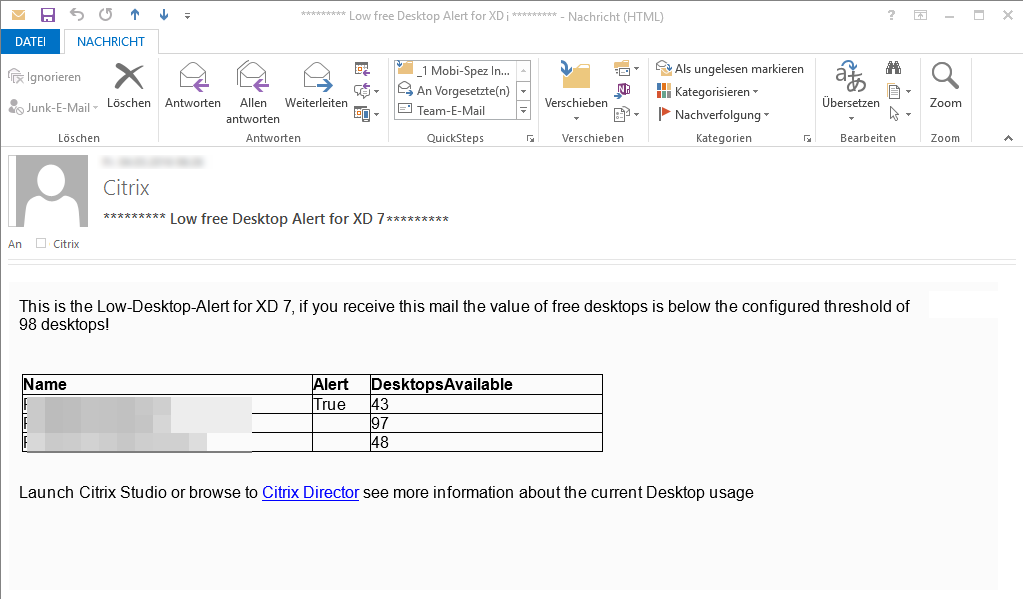
The Citrix Director is not so bad, and with Version 7.7 it is still better because now it’s possible to send email alerts. But one problem I still have … our provided pooled XenDesktop which are used for remote access with private computers are victim of a good reputation … this means a good word-of-mouth advertising in our company more and more people are tempted to use it … and we need to know when the number of free pooled desktop is low. And no I won’t go the read the numbers every day in director or Citrix Studio.
So I created a small script which send me an email as soon a defined threshold of free desktops is reached:
The code is on GitHub:
https://github.com/sacha81/Citrix-XD-Alert-low-free-desktops
Citrix User Profile Manager 5.3 ?
The hidden release of UPM 5.3, the finding of today … 2 days ago the Feature Pack 3 for XenApp & XenDesktop which contains the new Citrix Virtual Desktop Agent which should support Windows 10 .
I replaced the VDA Tech Preview with this Version on my Win 10 VDI. In my updating fever I also tried to update it on my Win7 VDIs, and wow, I found out that it contains a new version of Profile Manager, version 5.3!

I was surprised that with the installation of FP3 some profile issues i had was gone on my W7 VDIs.
But unfortunately I have issues with the Keyboard when I accessing my VDI’s from Mac OSX clients
http://discussions.citrix.com/topic/371328-xendesktop-76-fp3-3-vda-keyboard-issue-with-mac-receivers/
Problem: I want to solve my profile issues but I cannot install FP3 VDA because of this issue.
Erik Bakker (@bakker_erik) gave me the great hint to unzip the VDA Source (VDAWorkstationSetup_7.6.300.exe or the vdaserversetup.exe) to extract the files needed for UPM 5.3. Thanks!


Installation of UPM 5.3 also appears on appwiz.cpl

So if you are in a similar situation like I was this is a possible way to get early a UPM 5.3 installation without the need to update the VDA. But keep in mind, this is a dirty hack an I’m pretty sure that it wouldn’t be supported from Citrix … All what you do, you do on your own risk. Possibly there’s a reason that UPM 5.3 is not yet officially released … see http://discussions.citrix.com/topic/371286-profile-management-53
Update: Seems there are Issues with UPM 5.3 on Windows 10, I propose to wait with the installation of 5.3.
PoSh Script who alert me if I’m running out of pooled Desktops
Just a small one, last days I’ve created a small script who alert me if I’m running out of pooled Desktops.
If you run this script at regular intervals you will receive an email as soon you have less desktops free than you defined as threshold:

#==============================================================================================
# Created on: 08.2015 Version: 0.2
# Created by: Sacha Thomet
# File name: Citrix-XenDesktop-Alert-low-free-desktops.ps1
#
# Description: Check for Free Desktops in DeliveryGroups
#
# Prerequisite: None
#
# Call by : Scheduled Task e.g every 10 minutes
#
# Changelog:
# V0.1 Initial Version, create report file from array FreeDesktopReport and attach this to the email.
# V0.2 Change from txt-file to formatted HTML-Mail
#
#==============================================================================================
if ((Get-PSSnapin "Citrix.Common.Commands" -EA silentlycontinue) -eq $null) {
try { Add-PSSnapin Citrix.* -ErrorAction Stop }
catch { write-error "Error Citrix.* Powershell snapin"; Return }
}
# Change the below variables to suit your environment
#==============================================================================================

# Variables what should be changed according your environment and wishes

$DeliveryGroups = @("Win7-Desktops","Win10-Desktops")
$minDesktops = 10
$directoraddress="http://citrixdirector.mycompany.ch"
$EnvironmentName="Production XenDesktop"

# E-mail report details
$emailFrom = "citrix@mycompany.ch"
$emailTo = "citrix@mycompany.ch"
$smtpServer = "mailrelay.mycompany.ch"

#=======DONT CHANGE BELOW HERE =======================================================================================

$mailbody = $mailbody + "<!DOCTYPE html>"
$mailbody = $mailbody + "<html>"

$mailbody = $mailbody + "<head>"
$mailbody = $mailbody + "<style>"
$mailbody = $mailbody + "BODY{background-color:#fbfbfb; font-family: Arial;}"
$mailbody = $mailbody + "TABLE{border-width: 1px;border-style: solid;border-color: black;border-collapse: collapse; width:60%; }"
$mailbody = $mailbody + "TH{border-width: 1px;padding: 0px;border-style: solid;border-color: black; text-align:left;}"
$mailbody = $mailbody + "TD{border-width: 1px;padding: 0px;border-style: solid;border-color: black;}"
$mailbody = $mailbody + "</style>"
$mailbody = $mailbody + "</head>"

$mailbody = $mailbody + "<body>"
$mailbody = $mailbody + "This is the Low-Desktop-Alert for $EnvironmentName, if you receive this mail the value of free desktops is below the configured threshold of $minDesktops desktops! <br><br>"

$FreeDesktopReport = @()

foreach($dg in $DeliveryGroups)
{
$desktops = Get-BrokerDesktopGroup | where {$_.Name -eq $dg }
$CurrentDeliveryGroup = "" | Select-Object Name, Alert, DesktopsAvailable

# Write Array Values
$CurrentDeliveryGroup.Name = $dg

$CurrentDeliveryGroup.DesktopsAvailable = $desktops.DesktopsAvailable

if ($desktops.DesktopsAvailable -lt $minDesktops )
{
Write-Host "Number of free desktops to low for DeliveryGroup $dg, sending email"
# Add Line to Report
$CurrentDeliveryGroup.alert = "True"
}

$FreeDesktopReport += $CurrentDeliveryGroup
}

$mailbody += $FreeDesktopReport | ConvertTo-Html
$mailbody += "<br><br>Launch Citrix Studio or browse to <a href=$directoraddress>Citrix Director</a> see more information about the current Desktop usage<br>"

$mailbody = $mailbody + "<body>"
$mailbody = $mailbody + "</html>"

# If any record raises an alert, send an email.
if (($FreeDesktopReport | where {$_.alert -eq "True"}) -ne $null) {Send-MailMessage -to $emailTo -from $emailFrom -subject "********* Low free Desktop Alert for $EnvironmentName *********" -Body $mailbody -BodyAsHtml -SmtpServer $smtpServer }
Or download the Script here
XenDesktop & XenApp FMA (7.x) HealthCheck – Oops!… I Did It Again
Some months ago I’ve created the Citrix PVS Health-Check Script which is a based on the idea and some parts of code from the Health-Check Script for XenApp 6.x of Jason Poyer (http://deptive.co.nz/) .
Because now XenApp 7 with the Release 7.6 is finally in a state where considering an upgrade of the 6.x farms make sense, I belief that the demand for a XenApp 7.x Health Check Script grows.
So I did it again and took the “HealthCheck framework” to build a new version which combines the Power of the Citrix PS-Snappins for XenDesktop/XenApp and the HTML-Output-Script of the existing HealthCheck Scripts.
The result is a new HealthCheck Script which is usable for XenApp and XenDesktop 7.x and what makes me also happy, with only a few line of more code the Script is downwardly compatible for XenDesktop 5.6 environments.

This is just the first version and I’m sure that more check’s need to be added. Feedback and “Feature requests” are welcome … And to be honest I have not yet a big environment to test my Script, so please be insightfully if you find some bugs and report them to me.
In the first part of the Script you are able to configure some parameters. You can decide if you only want to see the “bad” Desktops on which something it’s going wrong or if you want see everything. In huge XenDesktop environments you want definitely only see the bad machines … ( $ShowOnlyErrorVDI = 1 ) Also you can decide if you want only report XenApp or only XenDesktop or both. The Desktops and XenApps are in two different Tables. It’s also possible to exclude Collections ($ExcludeCatalogs) from the Check, so virtual Desktops which are for testing purposes are not checked.

If you have a feature request or a bug report please post it direct on GitHub.
Update 12.05.2016 (Version 0.95):
– Check CPU, Memory and C: of Controllers
– XenApp: Add values: CPU & Memory and Disk Usage
– XenApp: Option to toggle on/off to show Connected Users
– XenApp: DesktopFree set to N/A because not relevant
If you need a Health Check Script for XenApp Version which are older than XenApp 7.x see http://deptive.co.nz/xenapp-farm-health-check-v2 where it’s an excellent work and the inspiration for my HealthCheck-Scripts!
The code is on GitHub:
https://github.com/sacha81/XA-and-XD-HealthCheck/
For Bug Reports or feature Request please use GitHub, of course you can also contribute on this code!

