Hands-on
Surface Arc Mouse on iPhone with Windows App — and how to stop your screen from falling asleep mid-session
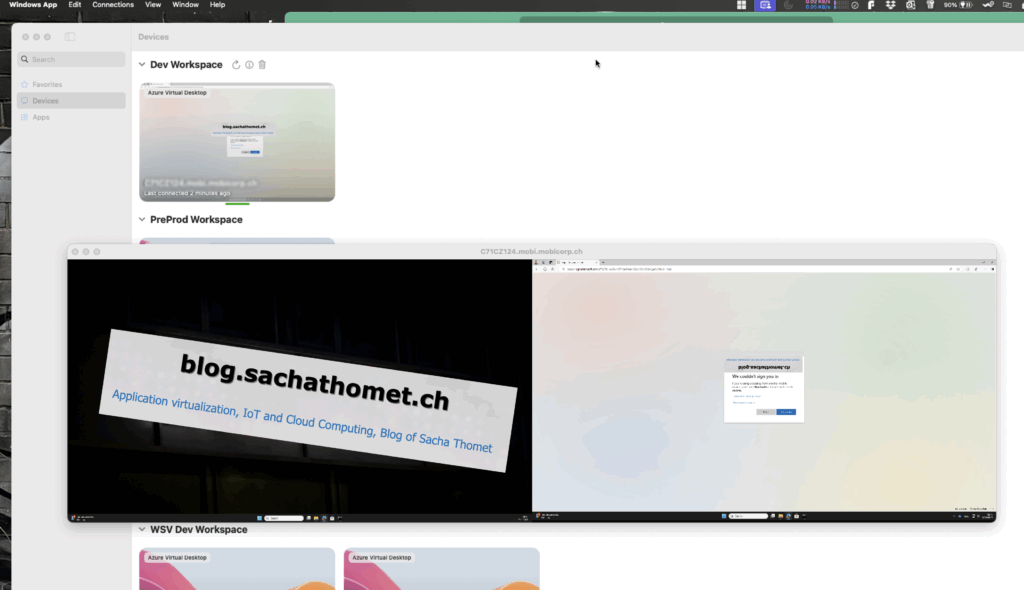
Picture this: the room you normally use as your home office doubles as the guest bedroom, and right now your guest is fast asleep in there at 7am. But you still need to work. So you grab your iPhone, your Surface Arc Mouse, your Logitech K830 keyboard, fire up the Windows App, mirror everything to the living room TV via AirPlay, and suddenly you have a fully functional Windows desktop from the couch. No laptop needed.
This was my setup this morning. I got my Surface Arc Mouse yesterday, played around with this setup, and already ran into the firmware update process. It works surprisingly well, once you figure out the sleep problem.
Part 1 — Surface mouse on iOS: it’s a preview, but it works
Microsoft quietly added Surface mouse support to the Windows App on iOS. It’s currently in preview, and only specific devices and firmware versions are supported. Let’s go through the setup.
Supported devices
- Surface Mouse
- Surface Arc Mouse
Prerequisites
- iPhone 15 or above with Bluetooth enabled
- A Windows PC with the latest Windows updates installed
- A supported Surface mouse
Step 1 — Firmware update (don’t skip this)
Before anything works, your mouse needs a firmware update. And here’s where Apple fans get a gentle reminder that the world does not always revolve around them — the firmware update can only be done from a Windows PC. Not iPhone. Not iPad. Windows. You’ve been warned.
The required firmware versions and download links for both the Surface Mouse and Surface Arc Mouse are listed in the Microsoft documentation. Run the MSI package in administrator mode on a Windows PC, connect the mouse via Bluetooth, and leave it sitting there for 10 minutes doing absolutely nothing. (Yes, really. Ten minutes. Firmware is not in a hurry.)
Step 2 — Pair with iPhone
Settings → Bluetooth → select the mouse from the list of available devices.Step 3 — Use it in the Windows App
Open the Windows App, start your AVD or Cloud PC session — the mouse is automatically detected. No additional configuration required. You’ll see a proper Windows cursor in your remote session. It genuinely feels like sitting at a desk.
Part 2 — The problem: your iPhone falls asleep
Here’s the catch nobody tells you about. When you’re using a physical mouse and keyboard with your remote session, you’re not touching the iPhone screen. And iOS, in its infinite wisdom, sees zero screen activity — so after your Auto-Lock timeout, the screen dims and locks.
Your AVD session is still alive on the server. But you’re looking at a lock screen. Every. Few. Minutes.
The good news: there are several ways to deal with this. SimplyMac has a solid overview of all options: How to Keep an iPhone from Sleeping. Here are the most practical ones for our AVD use case:
Option A — Move the mouse?
Really, constantly moving the mouse and don’t stop it for more than 30 sec. Guess not …
Option B — Extend Auto-Lock to never or the possible maximum
By default, iOS locks the screen after 30 seconds of inactivity. You can extend this to never or up to the maximum your company has defined if you have an MDM managed device, in my case 5 minutes under Settings > Display & Brightness > Auto-Lock. That buys you more breathing room between interactions, though it does not fully solve the problem for longer sessions where you are heads-down in your remote desktop.
Security note: The longer your Auto-Lock timeout, the longer your phone stays unlocked and accessible if you step away or leave it unattended. In a home setup this is usually fine, but keep it in mind, especially in shared or public spaces.
Option C — Guided Access
iOS Accessibility feature that locks the phone into a single app and can prevent the screen from sleeping. Enable under Settings → Accessibility → Guided Access, then triple-click the side button when the Windows App is open. Slightly more setup, but reliable for longer sessions.
Option D — iOS Shortcuts automation (advanced)
For those who want it fully automatic: you can build a Shortcuts automation that sets Auto-Lock to “the maximum value” when the Windows App opens, and restores your normal setting when it closes. iOS Shortcuts supports app-open and app-close triggers — a neat two-automation setup if you’re comfortable with the Shortcuts app.
Hey Microsoft — one more thing
Until then: mouse around, pick your workaround of choice, and enjoy your living room office setup. The sleeping guest is optional but a good reason to show off with this use case…
Microsoft Teams for Mac on AVD & Windows 365: SlimCore Optimization is Now in Public Preview
If you know me, you know: I’ve been using Mac in my personal life since 2006. Not because I’m an Apple fanboy, but simply because it’s the better tool for me. And if you’re familiar with the EUC world, you also know that hasn’t always been straightforward. macOS has traditionally received new features a little later than Windows. With solutions like Microsoft Azure Virtual Desktop (AVD) or Windows 365, accessing corporate environments from a Mac has become quite solid, and here too, things have improved massively over the last few months.
But when it comes to Microsoft Teams in a VDI environment, Mac users like me have been at a slight disadvantage in recent months. On Windows, Teams optimization with AVD has worked reliably for years. On Mac, however, you were stuck with the older WebRTC-based optimization, missing out on features that Windows users had long enjoyed. That is now changing, starting with a Public Preview.
What’s behind it?
With the new VDI solution for Teams (also referred to as “VDI 2.0”), Microsoft has replaced the existing WebRTC-based optimization with a new media engine called SlimCore, the same engine already powering the native Teams desktop client for Windows. The goal is clear: true feature parity between the native and virtualized Teams client, regardless of the endpoint device.
For Windows endpoints, SlimCore has been generally available since late 2024. Since early 2026, support for macOS endpoints is now in official Public Preview, for AVD and Windows 365 environments.

The official reference: Microsoft 365 Roadmap ID 502524 and the Microsoft Learn documentation for the new VDI solution.
Important: MAU version, not the App Store
There is one key detail here that is easy to miss:
MAU stands for Microsoft AutoUpdate, Microsoft’s update mechanism for macOS apps. The MAU version of the Windows App is obtained directly from Microsoft, not through the App Store. If you have been using the App Store version, you will need to switch to get the new optimization. The minimum required version is Windows App for Mac 11.3.2.
Prerequisites at a glance
| Component | Minimum version |
|---|---|
| Windows App for Mac (MAU version) | 11.3.2 |
| Microsoft Teams in AVD/W365 | 24193.1805.3040.8975 |
Enabling Public Preview: Admin steps
Public Preview is enabled via a Teams Update Policy in the Teams Admin Center, the same mechanism used for all Teams preview features.
... > Settings > About Teams > Early access, enable Public Preview and restart Teams when prompted.
How do I verify the optimization is active?
In the virtualized Teams client, navigate to ... > Settings > About Teams:
AVD SlimCore Media Optimized
New optimization active. All good.
AVD Media Optimized
Legacy WebRTC optimization active. Not yet on SlimCore.
AVD Media not connected
No optimization active.
Newer Teams versions also display a VDI status indicator directly in the top-left corner of the UI, no more digging through settings.
Conclusion
For Mac users in AVD/Windows 365 environments, this is a real step forward. The SlimCore optimization brings features like 1080p video, Gallery View 3×3/7×7, hardware acceleration, and significantly better performance, all things Windows users have known for a while. I’m genuinely pleased to see this finally coming to Mac.
It’s a Public Preview for now, so test it with appropriate expectations. But the direction is right.
Official links
📄 Microsoft Learn: New VDI solution for Teams
🗺️ Microsoft 365 Roadmap: ID 502524
All information in this article is based on publicly available information from Microsoft.
Why the Windows App for Mac (v11.1.4) is a personal highlight for me
TL;DR: The new Windows App for Mac (Version 11.1.4) introduces two key features that are barely or not at all mentioned in the official release notes, but make a big difference:
1. YubiKey/Passkey support directly inside the AVD session
2. Much improved behavior when resizing across one or multiple monitors
This version finally makes AVD on Mac truly usable for me – an unexpectedly big step forward.
For over two years, I’ve been hoping that Microsoft would bring the Windows App for macOS (the successor to the old Remote Desktop App) up to the level of the Windows version – especially regarding authentication options like FIDO2/YubiKey (WebAuthn).
In the company I work for, we actively use AVD, for example, as virtual development environments. Within our internal network, we rely on secure authentication with YubiKey – which works flawlessly on Windows devices or with Citrix, but not with the Windows App for Mac.
I also addressed this issue directly with Microsoft folks – namely Christiaan Brinkhoff and Sandeep Patnaik – at the Workplace Ninja Summit 2023. I love how at such events you can speak directly with PMs and give instant feedback. But it seemed to me that the macOS version wasn’t exactly a top priority at Microsoft. There was also a Microsoft User Voice for this topic, but since it didn’t receive many votes, it wasn’t given a high priority within Microsoft.
All the more surprising, then, when just a few days ago I stumbled upon the new version 11.1.4 – without any big announcement or fanfare. And suddenly, almost everything that had been missing just worked.
My personal highlights – not found in the release notes:
The official release notes mention some UI and session stability improvements – which is nice, but my real highlights are barely mentioned:
🔐 YubiKey and Passkey support in AVD sessions
A feature I’ve wanted for years: The ability to authenticate directly inside the session using a FIDO2 key, for example in internal portals or apps.
Previously, the Mac system would block the key or not recognize it at all:
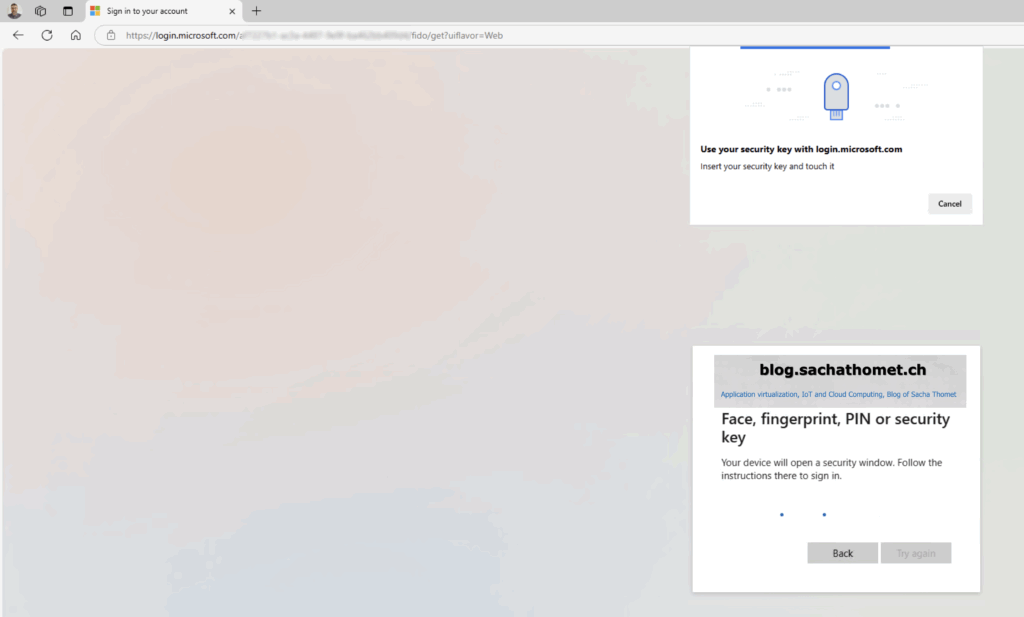
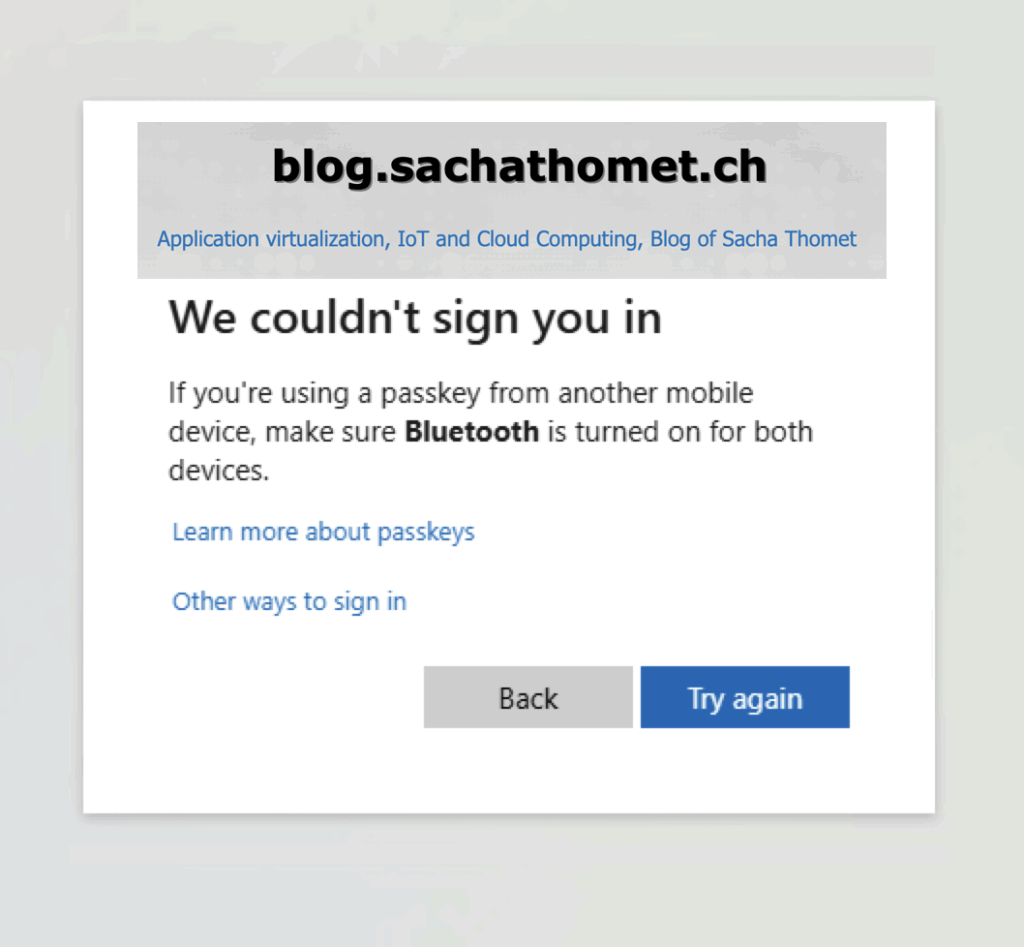
was sadly the result when trying to use the YubiKey before.
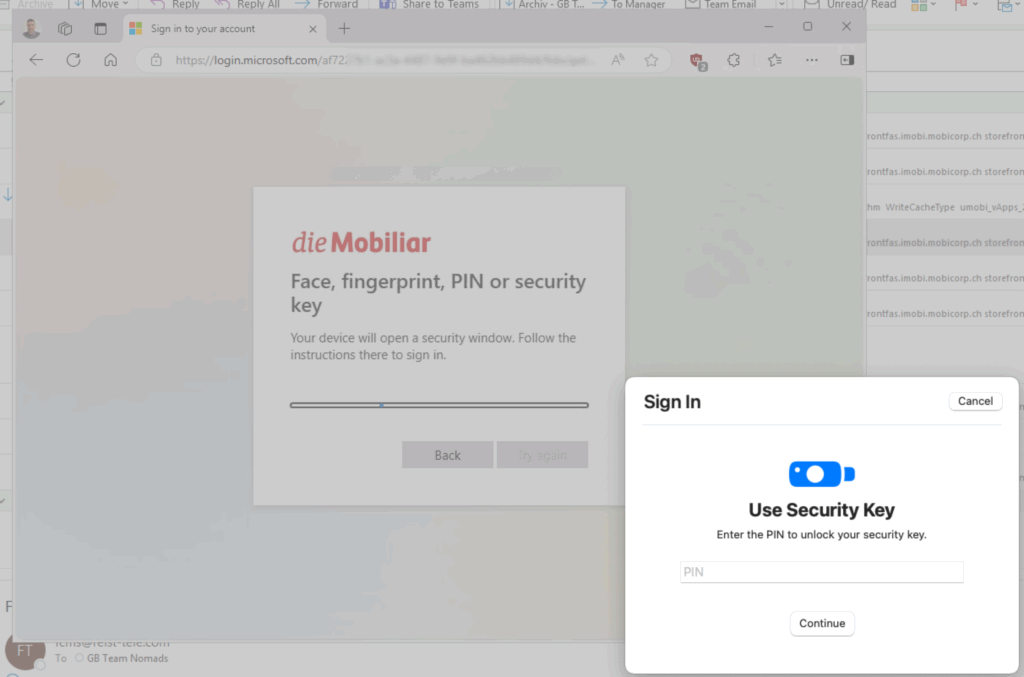
Now it finally works – seamlessly and without hacks, Key Pinpad appears:
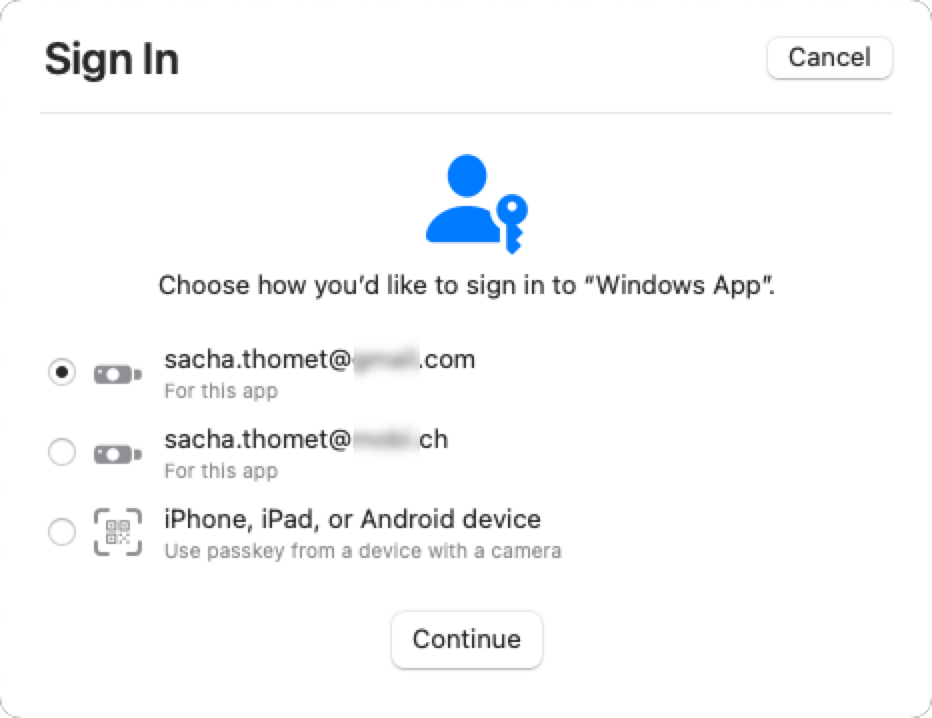
And if you have multiple identities on one Key, even the identity selector appears:
🖥️ Dynamic resizing across multiple monitors
Previously, minimizing a fullscreen session from 2 monitors down to 1 looked like this:
Here’s another subtle but noticeable improvement: The session now adjusts much better when switching between fullscreen and windowed mode, or when working across multiple monitors.
Previously, this often caused incorrect resolutions or frozen layouts – now it just works smoothly.
Who should update? Conclusion
If you’re accessing AVD or Windows 365 from a Mac, this update is absolutely essential. (The update is availible over the Apple AppStore)
While the Windows App for macOS may not yet be a full replacement for Citrix, it’s becoming an increasingly serious alternative.
One more thing … my current opininon
Citrix is still the technological leader – especially when it comes to feature set and protocol flexibility. But it’s also worth asking: do you always need everything Citrix has to offer?
Microsoft has clearly made significant progress recently, particularly in terms of protocol performance and display rendering. With updates like this, the gap is closing rapidly – faster than many might expect.
Just today, I ran a quick comparison using Remote Display Analyzer. I played my employer’s latest promotional video in fullscreen mode on one display and measured data transfer over 15 and 18 seconds respectively. The result? RemoteFX is no longer significantly behind ICA when it comes to data transmission.
Citrix HDX aka ICA: 163.3 MB in 15 sec

Microsoft RDP RemoteFX: 168.9 MB in 18 sec

Multiple Personal Desktops with Azure Virtual Desktop – A Likely Underrated New AVD Feature
Last week, I was delighted to discover a LinkedIn post by Christiaan Brinkhoff pointing to the blog post “In public preview: Multiple personal desktops with Azure Virtual Desktop.”
In our company, we’ve really missed this feature. We typically follow a “one device strategy,” where each user has exactly one device – either a physical laptop or a virtual desktop (VDI). We’ve been using VDIs for a long time, especially for external partners, test environments, and internal users with special requirements. Until now, we have implemented this On-Premises with VMware as the hypervisor and Citrix as the broker. Providing multiple VDIs per user has never been a technical problem.
Currently, however, we are in the midst of a cloud transformation, and Azure Virtual Desktop (AVD) is the cloud-based VDI solution of our choice. But here, we encountered a limitation: the ability to assign multiple virtual desktops to a single user. This made the announcement of the new feature even more exciting for me, even though it is still in public preview. I do, however, expect that it won’t be long before this feature is generally available.
Why is this a game-changer?
I’m convinced that many companies face similar challenges to ours. For instance, software testing often requires more than one virtual machine (VM). Similarly, robotics VDIs frequently need to access multiple desktops on the same user. Moreover, there are cases of incidents where it is better not to repair the virtual machine but rather to replace it with a new instance based on the “pets vs. cattle” principle. In these scenarios, it can be very useful to temporarily have access to two virtual desktops to extract data or transfer certain configurations from the old VM to the new one.
Previously, the only way to achieve this was through two host pools. The downside was that the user would see two resources, even if they were only permitted to access one of the two VMs. With the new feature, this is no longer an issue. Even when using multiple host pools, the feature ensures that no “ghost resources” are displayed when no resource is available for a user in a host pool.
What’s new and how do you enable it?
As you can see in the image, activating this feature is very simple – you just need to set a flag to enable the functionality:
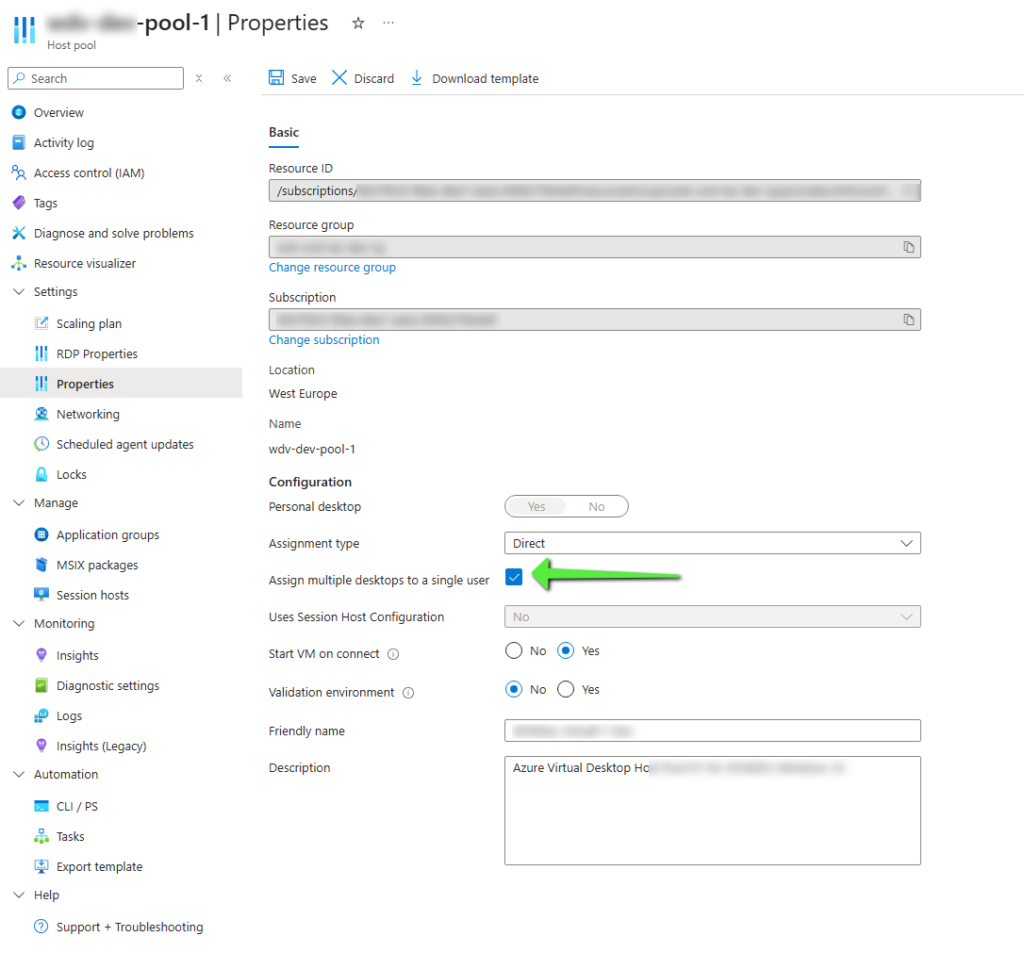
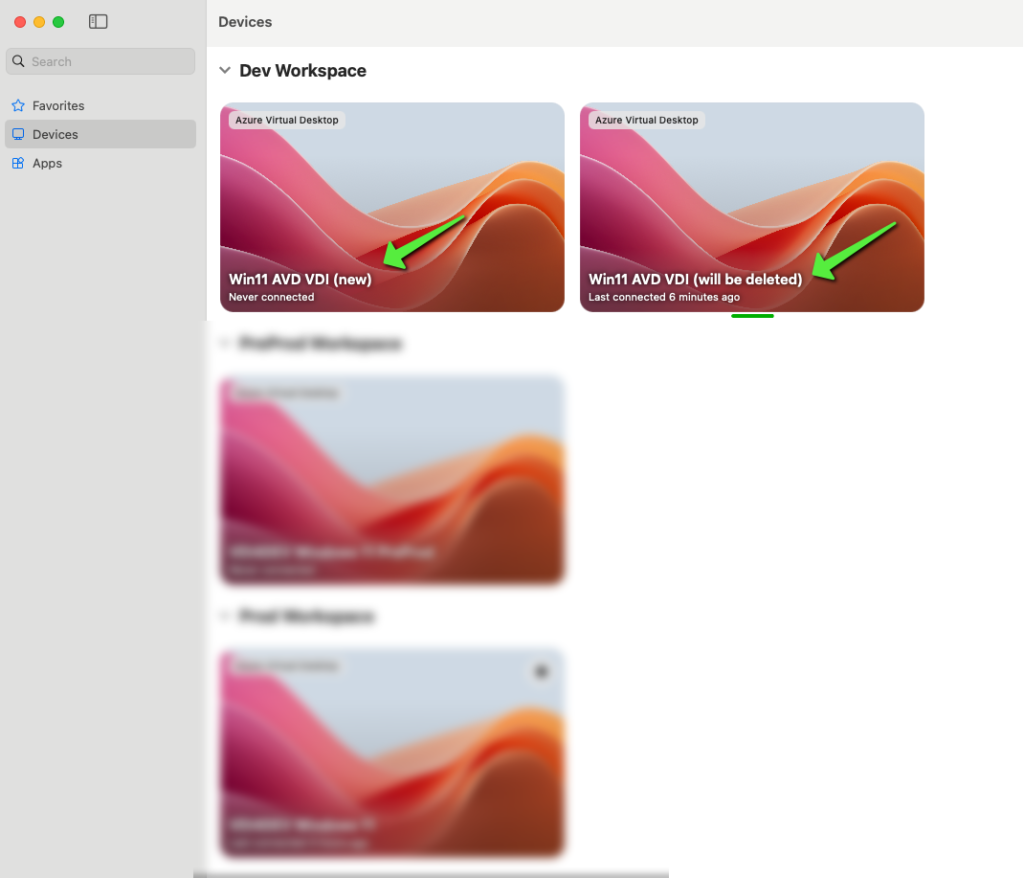
After that, a new field named “Friendly Name” appears in the AVD client to help users differentiate between the virtual machines:
Limitations of the feature
Currently, this feature only applies to AVD Single-Session machines. It does not work with Multi-Session deployments or Windows 365. It’s unclear whether or when this feature will be made available for Multi-Session environments, but in my opinion the need is more fore SingleSession VDIs.
Conclusion
This new AVD feature is a real step forward for companies that need multiple desktops per user, whether for testing, troubleshooting, or special requirements. I am excited to see how this feature evolves and when it becomes generally available. It will certainly help many companies make their VDI environments more flexible and user-friendly.
What’s your opinion? Is this feature another step toward feature parity with existing virtual desktop solutions? What would be your next desired feature? Let me know in the comments.
Tokenbased Citrix VDA registration
and how to combine the Microsoft AVD world easily with Citrix DaaS …
Over the past few months, Citrix has made significant investments to make the Virtual Desktop Agents (VDAs) independent of Windows domains. This was particularly important for Linux and Mac systems, and for some time now, it has been possible to provision non-domain-joined VDIs in Azure using Citrix tools. New in version 2407, available for the first time as a Tech Preview, is the ability to integrate Windows machines provisioned through other methods using a token, without requiring a domain, Delivery Controller, or Cloud Connector.
During the VDA installation, instead of specifying a Delivery Controller (DDC), the token can be directly provided:
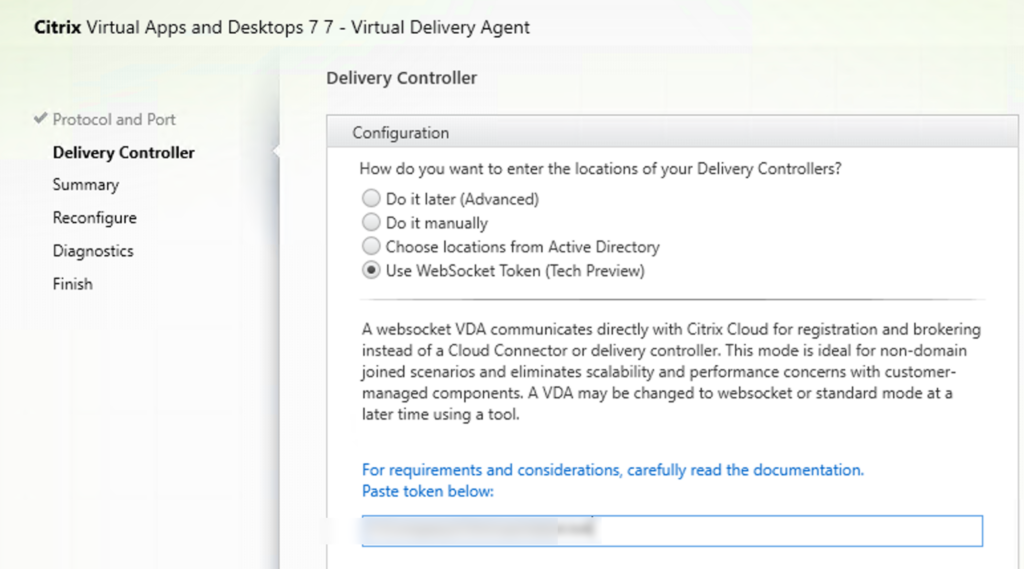
(Important: The token itself, not the path to the token file, must be specified. This will maybe in future changed to provide a token File).
Instructions from Citrix: https://docs.citrix.com/en-us/citrix-virtual-apps-desktops/install-configure/install-vdas.html#step-7-delivery-controller-addresses
The token must be generated first in the Citrix DaaS Console on the appropriate machine catalog where the VDA is to be integrated, via right-click:
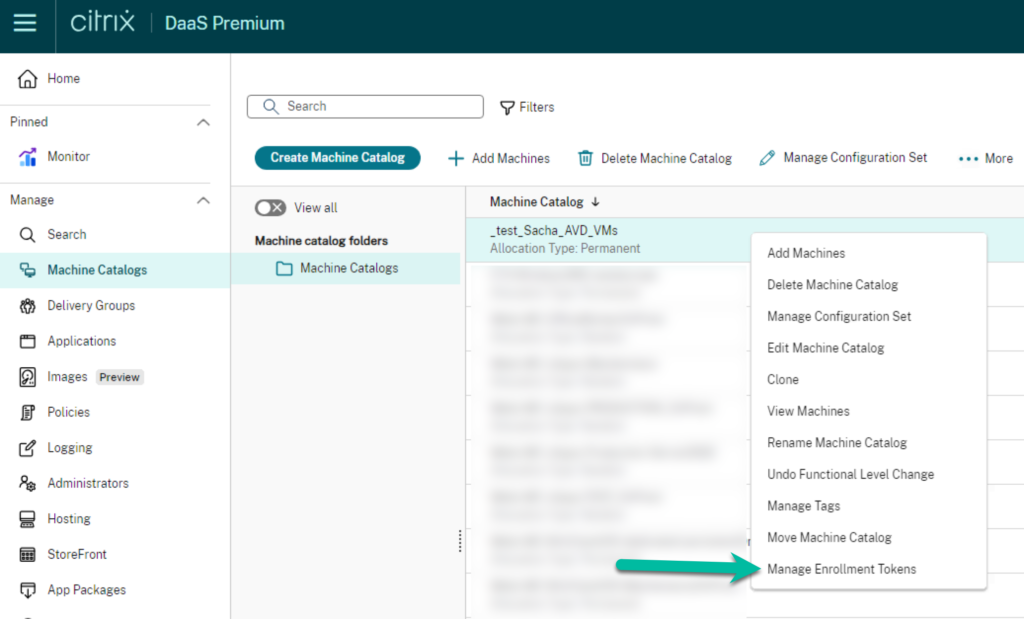
It has to be a machine catalog with the Provisioning Method on the Setting Manual.
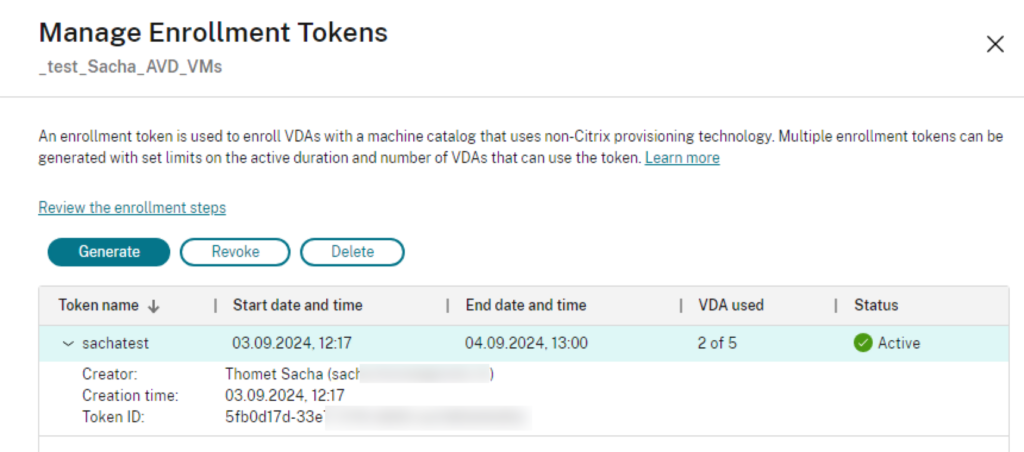
A single token can be used to deploy up to 100 VDAs, and the token is valid for a maximum of 14 days.
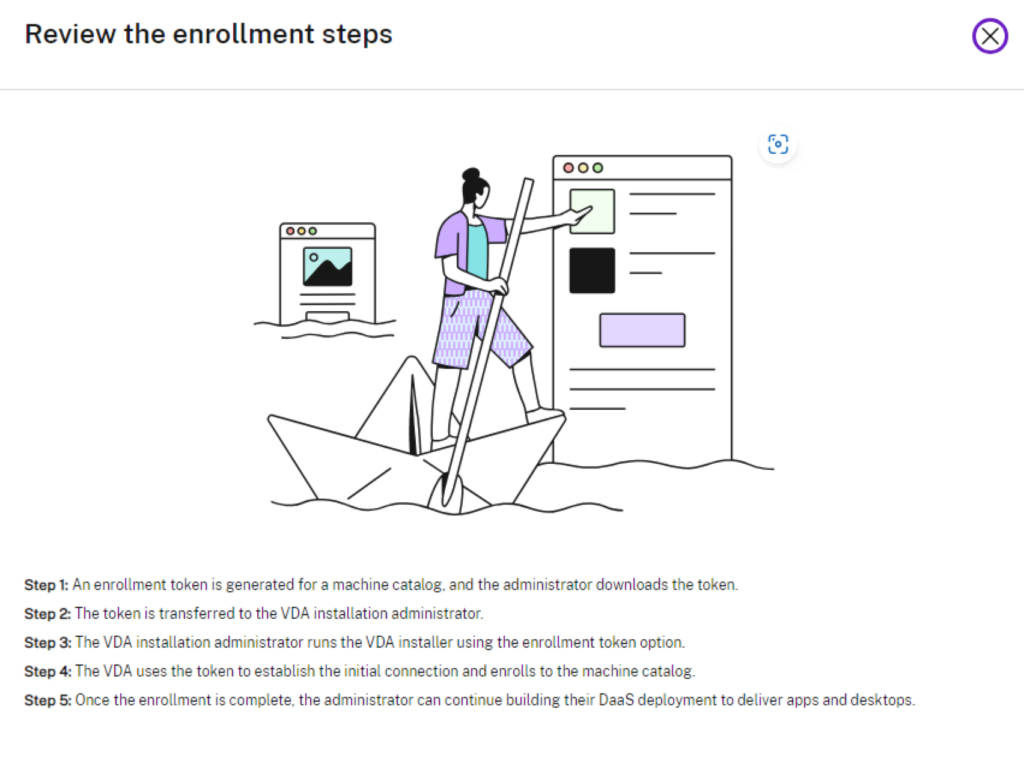
The installation steps are also described in the “Review the enrollment steps” section.
I used this new feature to integrate Azure AVD VMs created via pipeline into Citrix, which I had previously used through AVD. Now, I essentially have a VDI that I can broker and connect to traditionally via Microsoft, but also through Citrix. You may ask yourself why someone want to have the whole Citrix brokering stuff, but not using the Citrix provisioning method for Azure (MCS), this can have different reason, possibly because someone want to use an automated IaaS pipeline with bicep and have control over the provisioning / building of the infrastructure, or other obstacles to not using the Citrix techniques to build VMs. I can’t say more here, I just see a way to make things different and gain more control but still use the advantage of the Citrix techniques in brokering and the ICA protocol.
Since my machines are only in Azure AD, it is important that I configured the delivery group to set the LogonType to AzureAD. I accomplished this with the command:
Set-BrokerDesktopGroup <DeliveryGroupName> -MachineLogonType AzureAD
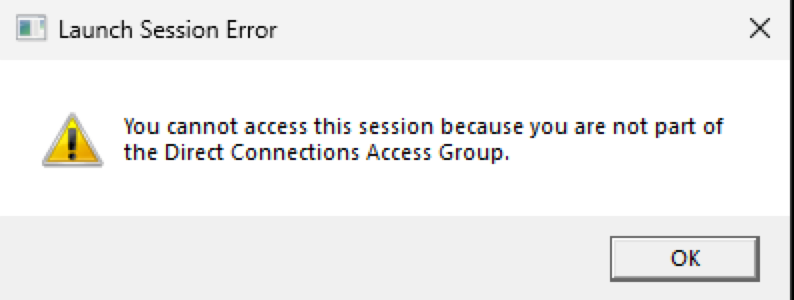
Additionally, if I still want to access the machine without Citrix, I need to add my user to the Direct Connection Access group. Otherwise, when connecting without Citrix, I will receive the following error:
These are my first experiences with the new token-based VDA rollout. Of course later these steps must be automated for a business environment when using the token, whereas in my hands-on experiment, everything was done manually through the graphical interface. If you are experimenting with this, please keep in mind that’s a TechPreview and not yet GA.
Another step towards virtual reality in daily work Quest Pro – 1: Hands On with Immersed
This post is the first in a series of articles I’m doing on my current experiments with my new Meta Quest Pro. I’ve been excited about virtual reality for a few years now, and I’m always looking for ways to use it in everyday work, especially with a focus on end user computing so that any normal office worker can use it. So my idea to replace real screens with virtual ones and make any place in the world an office, no matter how little space you have. My first post on this blog was 4 years ago, where I tried to work on a remote desktop with my first 3DoF VR glasses, the Oculus Go, using the Citrix Workspace app. After that, I also explored the virtual worlds with the successor models Quest 1 and Quest 2. In the meantime, a lot has happened and I have been in possession of a Quest Pro for a few days now. This VR headset is now the headset for professional use according to Meta, the parent company of Facebook which acquired Oculus back in 2014.
Not everyone has access to a virtual desktop environment, be it VDIs or DaaS, whether Microsoft with Windows 365 or AVD or Citrix with their solutions, which I encounter in my daily work. Actually, it is a bit too crass to work on a virtual desktop in a virtual world, a bit too much “inception” – that’s why we start here with the possibility to simply use the VR headset as a virtual screen. There are already various solutions for this, Meta itself pushes their Horizon Workrooms, in the following video I tested an alternative solution with the free app “Immersed”. See for yourself, a video says more than words and pictures:
In this scenario I have a normal work day, as I’m always multitasking I’m working on my connected company virtual desktop and I’m also learning new things about Citrix in a Youtube HowTo video. I need a coffee and I can go in my kitchen and brew one without stopping watching the how to video.
Yes, this video shows some personal details about my flat and living situation … some chaos on my dining table and an open bathroom … sorry about that … but that how real live is …
Links and explanations:
3DoF: This term means three dimensions of freedom, with this kind of VR headset you can look around, you have a virtual work around you but you can’t move in it. More about difference between 3DoF and 6DoF you will easily find when you use Google.
MetaQuest Pro: https://www.meta.com/ch/en/quest/quest-pro/
Immersed: https://immersed.com/ works also on other Platforms than Meta Quest!
Immersed Meta Quest Link: https://www.oculus.com/experiences/app/2849273531812512
YouTube Video which I’m watching in this Demo: Tech Insight – Citrix Virtual Apps and Desktops Service
If you’re thinking about getting a Quest yourself, use my referral link to get a $30 software voucher: https://www.oculus.com/referrals/link/sachat1981 By the way, the Quest 2 costs a third of the Pro and you can use Immersed with it too.
No Computer, no wires – a very short Oculus Quest Review
This blog article is slightly different from all others. As you can imagine tech is for me always fun, even when it’s from my professional life as a System engineer for virtualization. But this article is only about fun, with no professional aspects … today …
More than a year ago, I posted the article about using the Oculus Go VR headset to access Citrix virtual Desktop session: http://blog.sachathomet.ch/2018/11/25/virtual-virtual-workplace-or-my-first-vr-experience-with-citrix-and-oculus-go/
Yesterday I created a short video for my friends to let dem understand what I mean when I tell them that I gambled in VR instead of a morning workout 🙂
Here you can see what a VR Player sees and how awkward this looks from outside:
The reason why Oculus Quest is the breakthrough for VR?
Price and easy as pie technology:
The Oculus Quest gives you access to the world of virtual reality for less than 500.- Swiss francs (about 500.- US $), and you don’t need a high-performance gaming Computer. In contrary to the predecessor Oculus Go the Quest is not limited to one point in the room where you stand or sit, you have real 6DoF. 6DoF means you can move across a room, you have Six Dimensions of Freedom. Other existing VR Headsets need for that a permanent Setup in the room with “Lighthouses” that the Headset knows where you are. The Quest has only 4 integrated cameras and will build the virtual Guardian with those. Before you start to play you define your field when you are running to the edge of the field during the game you can see that as a grid.
More recordings here on YouTube Playlist: https://www.youtube.com/playlist?list=PLDX-0d_gd9OdXmL24Aj-c2ZtA0plOqzXG
Virtual bank accounts – FinTech compairson

Some weeks ago, I created my first FinTech blog post about using ApplePay without an expensive Credit card instead of using a Revolut card.
Now I try to share a bit more my experiences with different virtual bank accounts I’ve tested. If you have read the other blog post you have maybe seen in the comments that I was asked about Boon. I’ve used Boon already some years ago and I also had the chance to test TransferWise more than a year ago. Last days I gave the Neon-free and ZAK a chance, this was the first two Swiss virtual bank account I’ve found.
I’m not working for a bank and so I can give now with my current standpoint my view and insights as a normal customer.
First I have not focused about fees, more about functionality and created the following table:
| Boon | Revolut | Transfer Wise |
Neon (Hypothekarbank Lenzburg) |
ZAK (Bank Cler) |
|
|---|---|---|---|---|---|
| physical Card | No | Yes | Yes | Yes | Yes |
| virtual Card | Yes | Yes | No | No | No |
| Disposal Card | No | Yes, only Premium |
No | No | No |
| ApplePay | Yes | Yes | Yes | Yes | Yes |
| Instant Card Freeze in App |
N/A | Yes | Yes | No | No |
| Instant Info by Transaction | Yes | Yes | Yes | Only SMS | No |
| Advanced Payment Security |
N/A | Yes, Location Based, ATM, Contactless, Magnetic stripe (Swipe), Online Transactions |
Yes, ATM, Chip&Pin, Contactless, Magnetic stripe (Swipe), Online Transactions |
No | No |
| Payer authentication (e.g. 3D Secure) |
N/A | Yes | ? | ? | ? |
| Location of the Company | UK | UK | UK | CH | CH |
There are also other virtual banks like e.g. N26, but honestly I had not the time to test all what is currently existing. Also my insights are a snapshot in time snapshot in time from now July 2019. New features are coming fast and things are gonna changing every week.

Now I can say Revolut has the most comprehensive offer! But I have some friends here in Switzerland which don’t trust to a foreign bank and they are sceptical about the worker conditions in this company.
Everyone needs to do his own choice, the world is changing and the disruption of the classic banks has started. I’m sure that this is not only good for the Country I’m living in, but I really hope that it has it’s good sides for the consumer of banking services.
If you have any questions to the virtual bank account’s I’ve tested feel free to add a comment to this blog post. If you have your own experience and want to share, a comment is also appreciated!
If you want to sign-up for Revolut, ZAK or Neon, feel free to use my invitation Link and get some perks.
Revolut: Sign-up with my link and get a physical card for free as soon you topped up 10.- and used your card.
ZAK: Ask me for an invitation and get 50.- CHF
Neon: Use my invite code BTNN4F and get 10.- CHF
updated 2.2.21
How to use ApplePay without an expensive Credit card even in Switzerland and other countries
Those who follow me on Twitter and Facebook have already seen that I promoted the Revolut card multiple times. This was just as a happy customer! When I’m really convinced of a product I love to spread the word and want that others also can use the new cool stuff! I was a Revolut User since the beginning of 2018 and until today I spend over 8000 CHF over Revolut in 8 countries.

Yesterday 2 very important things happened
#1 Revolut introduced ApplePay for every customer (Standart, Premium & Metal).
#2 Revolut added me to the Pioneer Programm.
#1 Means you can now open a Revolut account in seconds and you are ready after some minutes to use ApplePay!
#2 Means not only that I receive from Revolut nice influencer perks, but it also means when YOU open a Revolut account with my link, but you should also receive your first physical card free of charge. Now you ask yourself why a physical card when you have ApplePay …Ok, first, a backup is always good, e.g. what if your iPhone battery is discharged. Also, you need the card if you want to pull money from an ATM. Revolut does not charge you until up to 200.- month on Standard for cash withdrawals at ATMs!
Ok, wait… was is Revolut precisely?
Revolut is an e-money service, which means app plus physical or virtual card. With Revolut, you can spend at home or abroad at the real interbank exchange rate (without unfair bank fees), set spending budgets, split bills, exchange currencies and withdraw from foreign ATMs for free (up to £200 month on Standard). With Revolut you can freeze/unfreeze your cards at the tap of a button. And with Premium and Metal account, where you pay a monthly fee, the possibilities are even more. But start with the Standard, you can do every time later an upgrade if you need.
Insider Tipps?
- If you have to choose the currency during payment or at an ATM, ALWAYS choose the currency of the country you are currently in, so you avoid bad conversion rates outside of the force of Revolut.
- You are on a weekend trip and use your Revolut card during the weekend in a foreign currency? Exchange the money you need on the weekend already on Friday and avoid “weekend-fees” from Revolut.
- There are ATMs which have fees for the transaction by the ATM carrier, you will see this before of the transaction, keep an eye on it, I see fees between 0.- and 5.-! This is outside the force of Revolut.
- If you are in a Hotel or a Car rental and you want to use the Revolut card, consider that they may block a larger amount of your money!
- Don’t top up the Revolut card with a classic Credit card, there are Banks (e.g. Corner in Switzerland) who charge 5.- CHF fee to charge Revolut.
How to start?
- Click the link
- Enter your phone number (a text will be sent upon completion)
- To Download the app
- Create a new account in minutes
- Verify your account and top-up at least €10 or local currency equivalent
- Order your physical standard card for free
- You can create virtual cards and use those asap!
This Service is not yet available in all countries, but if you are not able to use the service you will see this already in Step 2. As I know there are some readers of my blog in the United States of America I have bad news … Currently, it’s not yet possible to open a Revolut account living in the US. As soon this will be available I will update this blog post.
And how can I use now ApplePay?
 You need a device that supports ApplePay e.g. an iPhone 6 or higher or an AppleWatch. Also, it’s mandatory that ApplePay is enabled in your resident Country.
ApplePay can be added directly in the Revolut App or in a classic way in the Apple Wallet app.
By the way, to use Revolut (even without ApplePay) you need a smartphone on which you can install the Revolut App!
Disclaimer: Some months ago I was pretty sure to never write a blog post about money or a Fin Tech company. Because this is about YOUR money YOU have to make your own decisions and be careful. What I suggest is to start with a free Standart account and just start with some pocket money. Revolut does not replace your today main account!
Virtual virtual Workplace – or my first VR experience with Citrix and Oculus Go
 On Black Friday sale I ordered my first VR Headset , an Oculus Go (64GB) for 222.- CHF (about 222 US $), in my opinion, a good deal for my first step in the word of Virtual Reality.
The Oculus Go is a very entry level VR with the benefit that you don’t need an additional Computer. The integrated hardware with an Android OS does all the work. But this article will not be a review of the Oculus Go as there are many others already available.
Usually, you use your Oculus Go with the apps in the Oculus store, but there is a known trick to load also other Android Apps to the Oculus, called “Sideload” and Android application. You need to set up your Oculus in Developer mode and then you are able to add APK files to the Oculus.
Here a good description of how to Sideload works: https://headjack.io/tutorial/sideload-install-app-apk-oculus-go
“Sideloaded” apps appear in Oculus Tv app in the section “unknown sources”, but unfortunately, I was not able to see the just uploaded Citrix Workspace App. I also tried after the installation of the Workspace app to just launch the Oculus Browser and open a Desktop from our companies “Citrix Web Receiver” (Netscaler, Storefront Web):
After that unsuccessful try to launch a virtual desktop, I tried to play around with sideloading other apps. I found out that the app Kodi and ES File Explorer appears in the Oculus Tv app in the section other sources. Both applications can be used to see and start other Android apps installed on the System.
So I can use the Oculus Tv to launch ES File Explorer and this app as a launcher for the Citrix Workspace App. Ok agree, all in all, sounds a bit like in the Movie Inception … virtual reality to Oculus app to native Android app to virtual desktop to other virtual desktops or virtual apps …
Unfortunately, I didn’t find out how to record the content running in Oculus when a sideloaded app is launched, so I had to trick for the video above, the first part is screen recorded, the second part is with a camera in the headset …
Conclusion
It’s pretty easy to set up an Oculus Go to run with the Citrix Workspace app, and the Oculus Go is an affordable VR headset. This is a cool tech demo, but not sure if I want to work a long time in an Oculus Go provided VR because this headset is really entry level. Assume headache and “VR fatigue” comes fast. Also, I miss a real Keyboard in VR. But with Augmented Reality or Mixed Reality, I think it can be a solution on the future to work with a virtual virtual Workplace!
For my tests I used:
Downloaded APKs from apkmirror.com :
ES File Explorer: com.estrongs.android.pop_4.1.8.7.1-729_minAPI14(armeabi,armeabi-v7a,x86)(nodpi)_apkmirror.com.apk
Citrix Workspace App: com.citrix.Receiver_18.11.0.0-94_minAPI19(armeabi,armeabi-v7a,x86)(nodpi)_apkmirror.com.apk
If you are not yet “jumped” in the VR World I can really recommend the Oculus Go 64 GB as the first VR Headset. You can buy it on your local electronics store or on Amazon.

