IoT
Mein Smart Home – Kapitel 2: Home Assistant
Nachdem mein Smarter Spiegel ein spannendes Projekt war, und ich nun die Werte der diversen Sensoren abfragen und anzeigen kann
, ist immer noch das Problem wie ich alle meine Smarten Geräte über ein Ort steuern kann. Das Sammelsurium ein Smart Devices bei mir ist vielfältig und ich will mit irgendetwas arbeiten können das offen ist für alles Mögliche.
 Durch einen Bekannten wurde ich via Facebook auf Home Assistant (home-assistant.io) aufmerksam. Home Assistant ist eine Open Source Heimautomatisierungsplattform welche auf Python 3 läuft.
Hass.io (Home Assistant) ist noch in der Entwicklungsphase aber läuft bereits recht gut. Ich bin irgendwo bei 0.48 eingestiegen und nun ist die Entwicklung im Dezember 2017 auf der Version 0.60.
Ich habe HA zuerst auf einem Raspberry Pi 3 laufen lassen, da ich nun ein Synology NAS gekauft habe das auch Docker Container beherbergen kann, habe ich mein HA nun auf Docker umgezogen.
Ich schreibe hier nun nicht eine Anleitung wie man das Ganze in Betrieb nimmt, das ist alles im Getting started auf der hass.io Seite beschrieben. Vielmehr soll dieser Post ein kurzes Intro zu Home Assistant geben und ein paar Praxis Tipps beinhalten.
Für Hass.io gibt’s auch ein Mobile-App, dieses funktioniert aber nur wenn man im gleichen Netz ist oder das HomeAssistant in das Internet exponiert. Die alternative ist ein VPN in’s eigene Heimnetz.
Geräte und Komponenten
HA kann mit fast allen meinem Smart Devices umgehen, folgende smarte Geräte habe ich heute im Home Assistant integriert:
- Philips Hue
- MyStrom (Glühbirne, Wifi Switch & Button.)
- Verschiedene Sensoren von WirelessTag
- Tesla Model S (Interessiert einen zu kaufen, verwende mein referral code)
- Netatmo Weather Station (Amazon Link)
- UniFi Controller
- Arlo Webcam (Amazon Link)
- Philips Webcam
- Apple TV
- Sonos One (Amazon Link)
- Logitech Harmony Hub (Amazon Link)
- Diverse Geräte im Netzwerk die mittels Wake on Lan geweckt werden können.
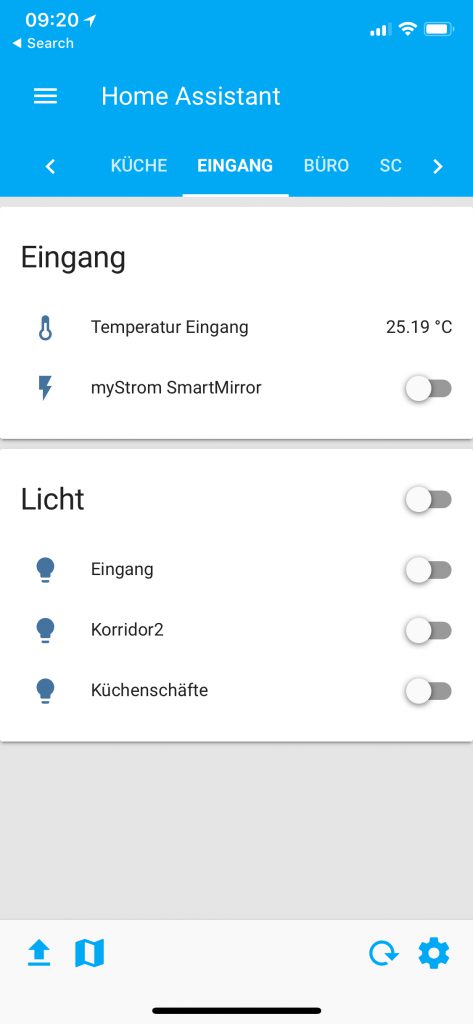
Eine kleine Demo wie das bei mir aussieht:
Automatisierung
Ich habe vor Home Assistant einige Sachen via IFTTT automatisiert, mit HA kann ich dies nun „On Premises“ machen.
Folgende „Rezepte“ habe ich zur Automatisierung gemacht:
- Wenn die IKEA Lampe im Wohnzimmer eingeschaltet wird, schalte auch die Bar-Beleuchtung (mit einem MyStrom Smart Plug versorgt) ein:

- Wenn UniFi keine WLAN-Mac’s der Mobiltelefone der Familie schaltet sich der „Away-Mode“ ein, darin werden zB. gewisse Smart Plugs stromlos gemacht, der Sonos wird auf Pause gestellt, die Lichter werden abgedreht und so weiter.
Zu diversen Rezepten braucht es natürlich dann auch ein „Gegenrezept“ damit nicht nur das einschalten des Away-Mode klappt, sondern auch ein Home Mode wieder aktiv ist sobald sich ein WLAN Modul eines Mobiltelefons im WLAN zu Hause einbucht.
Im Gegensatz zu IFTTT kann mit hass.io vieles verkettet werden, es können so genannte Conditions gesetzt werden kann eine Automatisierung läuft und wann nicht.
Tipps
Wenn ihr euch mit Home Assistant versucht und an den *.yaml files rumschreibt, nehmt unbedingt ein Editor welcher unsichtbare Zeichen anzeigt. Python ist extrem pingelig was Syntaxfehler, wenn auch nur mit unsichtbaren Zeichen, angeht.
Weiter macht Sicherungskopien von euren Konfigurationsdateien, dies kann der Frustration etwas vorbeugen.
Wenn ihr ein MyStrom Smart Button integrieren wollt, geht das heute scheinbar nicht, wenn das hass.io System mit einem separaten Passwort geschützt ist. Darum habe ich dies nur zu Testzwecken integriert und dann wieder herausgenommen.
Fazit
Der grosse Vorteil von Home Assistant ist wirklich das offene System und die grosse Entwicklergemeinde.
Der Nachteil bei Home Assistant ist, dass es immer noch ein ziemliches Gebastel ist. Zwar lässt sich immer mehr über die Weboberfläche konfigurieren und mittlerweile gibt’s die Weboberfläche auch in anderen Sprachen als englisch.
Für ein Endanwender der ein Tv einsteckt und fern sehen will ist hass.io aber definitiv nicht geeignet.
+ Kommandozentrale für das Smart Home
+ Kostengünstig
+ Interaktionen mit den smarten Komponenten möglich
+ viele Komponenten Integriert
+ App für’s Mobiltelefon
+ – Quelloffen (Integrieren eigener Sachen, verbesserung des Codes versus Security)
– Kein Enduser Produkt
– Benötigt Wartung
Bei meinem dritten Artikel in dieser Smart Home Serie werde ich von einem System berichten welches Endbenutzer-tauglich ist ohne Informatikwissen. Ich bin mir bewusst das viele Leser dieses Blogs IT Profis sind, aber auch diese haben Freunde, Verwandte und Bekannte die Smart Home machen wollen und keine Ahnung haben wie zu beginnen.
Mit Octoblu und Amazon Echo die Klimaanlage des Tesla Model S starten
Ja es braucht etwas Mut ohne Englisch als Muttersprache ein Video Webcast zu erstellen. Vielleicht ist es auch ein bisschen peinlich, aber trotzdem habe ich es gewagt, mein erster Video Webcast … wer nichts wagt kann nichts gewinnen 🙂 Sorry für den Schweizerdeutschen Akzent …
Ziel: Amazon echo dazu bringen die Klima/Heizung des Tesla Model S zu starten.
21.6.2016, Aktualisierung dieses Posts:
Auch ohne IFTTT ist es möglich mit Alexa das IoT Framework Octoblu anzusprechen. Eben habe ich einen flow kreiert welcher den Ladestand des Elektroautos abfragt:
Weitere Infos wie Alexa mit Octoblu integriert wird sind hier zu finden: Use Alexa to kick off automations with Octoblu
Übrigens, wenn du noch kein Tesla hast und einen kaufen willst nutze mein Empfehlungslink und spare damit 1000.- : http://ts.la/sacha3162
Steure ein MyStrom Wifi Switch mit einem Schalter (und ifttt oder octoblu)
 Some weeks ago I bought my first smart plug from MyStrom. If you are living in Switzerland you have only a limited choice of smart plugs because of the non EU standard plug (T13).
MyStrom is pretty cool because it mets almost all my requirement, there is a possibility to measure to power consumption within two rates (day and night), it’s controllable with the mobile phone app and there is a nice web interface.
But one thing I miss, I cannot react to triggers and power of the smart plug on a defined event. Like already in an earlier post mentioned there is a REST API which allows to control the plug from the internal network. (See Another LaMetric IoT script – power control)
Last day’s I just found the API documentation which allows to control the MyStrom out of the cloud:
https://mystrom.ch/mobile/
So I have now all to connect this Thing to the Internet and react on a trigger.
Possibility 1: The everything imaginable way,
MyStrom and Octoblu
 +
+ 
If you are using Octoblu beta, which is currently available for everyone for free you can create very intelligent workflows to control your smart plug. You can react to twitter and power of or on depending what is twittered, you can power off your heater as soon a temperature is reached, you can stop charge as soon your device have a defined state of charge.
The Things you connect use with Octoblu are nearly infinite.

Octoblu is for advanced use, and to be honest I’m also on the learning phase! I do not describe here more details for this case. There are a lot of sample blueprints on https://www.octoblu.com . Octoblu was acquired by Citrix in 2015.
Possibility 2: The easy way,
MyStrom and IFTTT
+ 
This way is suitable for „Home use“ and for people who only want to create a simple workflow where a trigger initiate for example a Power On or Power Of of the smart plug.
All what you need is a Control-Script on a Webserver with PHP on the Internet, and a IFTTT account.
How it works: The script is very simple, it just handle the authentication process on the API, read the AuthToken out of the JSON answer and Push out the payload with the AuthToken. IFTTT just take the trigger and call the script with the username, passwort and the payload which you can build from the API
Example: I want to control my smart plug by twitter, if I twitter #lightsoff
Step 1:
Take this script and put it on your webserver:
Step 2:
Create a recipe on IFTTT, use Twitter as Trigger and Maker as Action. In maker you create your request:
[yourwebserver]myStromAuthenticator.php?email=[youraccountemail]&password[yourpassword]&payload=[yourpayload]
e.g. the payload to turn of the device with Mac 64002D012325 is: https://mystrom.ch/mobile/device/switch?on=false%id=64002D012325
The result should be that:

You create 2 of those recipies, one to Power On and one to Power Off
Now you can twitter you defined hashtags to control your smart plug.
Ein weiteres LaMetric IoT Script – Stromsteuerung
Da ich momentan Urlaub habe, ist hier ein weiterer Artikel der aber nichts mit Virtualisierung zu tun hat …
I combined my new „gadgets“ the LaMetric time and my new wifi Smart-Plug from MyStrom. The goal was to report the current power consumption of power plug and the possibility to control the plug with the smart ticker.
MyStrom has a very straight forward API (https://mystrom.ch/en/mystrom-api), and the possibility to create apps for LaMetric is pretty easy what I’ve already mentioned in an past blog post.
All what is needed to implement this solution is:
- a web server which can parse PHP
- two small scripts
- and a private app for LaMetric
This is the script to see the current power consumption:
{
    "frames": [
        {
            "index": 0,
            "text": "  Watt",
            "icon": "i1692"
        }
    ]
}
I just read the content from the API, which is already in JSON format, but I reformat it that it is in that way which I need to bring it to the LaMetric.
This is the script to control the power outlet:
And the LaMetric private app:
This simple poll app call the script on the webserver (192.168.1.20) with the parameter of the MyStrom plug (192.168.1.59).
On button action the controller script is launched with change the status (off to on or visa verse)

(192.168.1.59 is the ip of my Power outlet. 192.168.1.20 is the address of my web server, this can be a raspberry pi or a Synology.)
IoT, LaMetric and mouse issues …
In summer 2014 I became a backer for the Kickstarter project LaMetric. LaMetric was advertised as a smart ticker for life and business. To be honest the Internet of Things (IoT) topic was not so present for me in summer 2014 and I just decided to spend some money for a cool gadget.
Last week I finally received my LaMetric Time and today I need to say it’s one of the coolest gadget I bought in the last months. With the acquisition of Octoblu, what Citrix made early this year and promoted on Citrix Synergy (especially on the GeekSpeak Tonight …) I’m now more aware of IoT an it’s possibilities!
LaMetric is the perfect IoT output device!
First LaMetric app
The creation of apps is pretty easy! On the LaMetric developper portal you can create your push or poll apps. With push you can transmit data to the LaMetric servers in JSON code. W ith pull it’s also easy, you just need a webserver on which you have a file in the correct format.
On this way I created the EuroMillions app which display the current Jackpot. The data are fetched from www.euro-millions.com and formatted with a small and simple PHP script:
{
"frames": [
{
"index": 0,
"text": "<?php
$host = "http://www.euro-millions.com";
$filestring = file_get_contents($host);
$startpos = 0;
// <div class="est-jackpot">&euro;30<span class="amount">Million</span></div>
while($pos = strpos($filestring, ">&euro;", $startpos))
{
$string = substr($filestring, $pos, strpos($filestring, "<span class=", $pos + 1) - $pos);
//echo $string. " ";
echo str_replace(">&euro;","","$string");
$startpos = $pos + 1;
}
?> Millions estimated in next Jackpot",
"icon": "i616"
}
]
}
Result:

First IoT LaMetric Project
Problem
I’m living in an old farmhouse which is converted with some apartments, but it’s still a old house with a lot of wood. And the old problems … mouses. So I have now since some weeks 4 mouse traps installed, not the killing traps, only those which able me to take the mouse out of my apartment.
Problem: Every morning I need to check all mouse traps, because the traps are hidden positioned an annoying daily work. And with the risk that the mouse need to wait hours until I find them.
Concept
Now the concept of my first IoT project is to get alerted as soon a mouse get in a trap.
I want to solve this with:
- a modified mouse trap with an attached window/door sensor, something like this http://store.wirelesstag.net/products/reed-kumosensor
- an Octoblu workflow
- and LaMetric as Output device.
The result must be this:

Implementation
Need some hours … I have to learn how to handle octoblu and learn a bit of JSON.

